Lab 02.A — Basic Static Analysis: Sample Acquisition
Date: 26 April 2026 Author: Emilio Mardones (Ofendor) Status: ✅ Completed Module: Basic Static Analysis — Sikorski Ch. 1, Module 102 Related: Lab 01 Setup Notes | Lab 01 Troubleshooting Log
1. Overview and Context
This is my second lab entry in the malware-analysis repository. If you have not read Lab 01 yet, I recommend going through both the setup notes and the troubleshooting log first, since this entry builds directly on that foundation, specially the isolated lab network and the VirtualBox snapshot system established there.
At this point, the lab environment is fully configured and confirmed working. The next logical step before touching any analysis tool is getting a real malware sample onto the analysis machine in a controlled, documented, and verifiable way. That sample acquisition would be covered in full, including the wrong turns I took along the way.
This lab entry corresponds to Sikorski and Honig’s (2012) Chapter 1 of Practical Malware Analysis and to Module 102 of my current study track. The module focuses on basic static analysis, which Sikorski and Honig (2012) describe as the first line of investigation: examining a file without executing it in order to extract as much intelligence as possible before any risk of code execution is introduced into the environment. Sample acquisition is the gate before that gate where nothing gets analysed until it arrives safely. You current set up should look like this, including all saved snapshots:
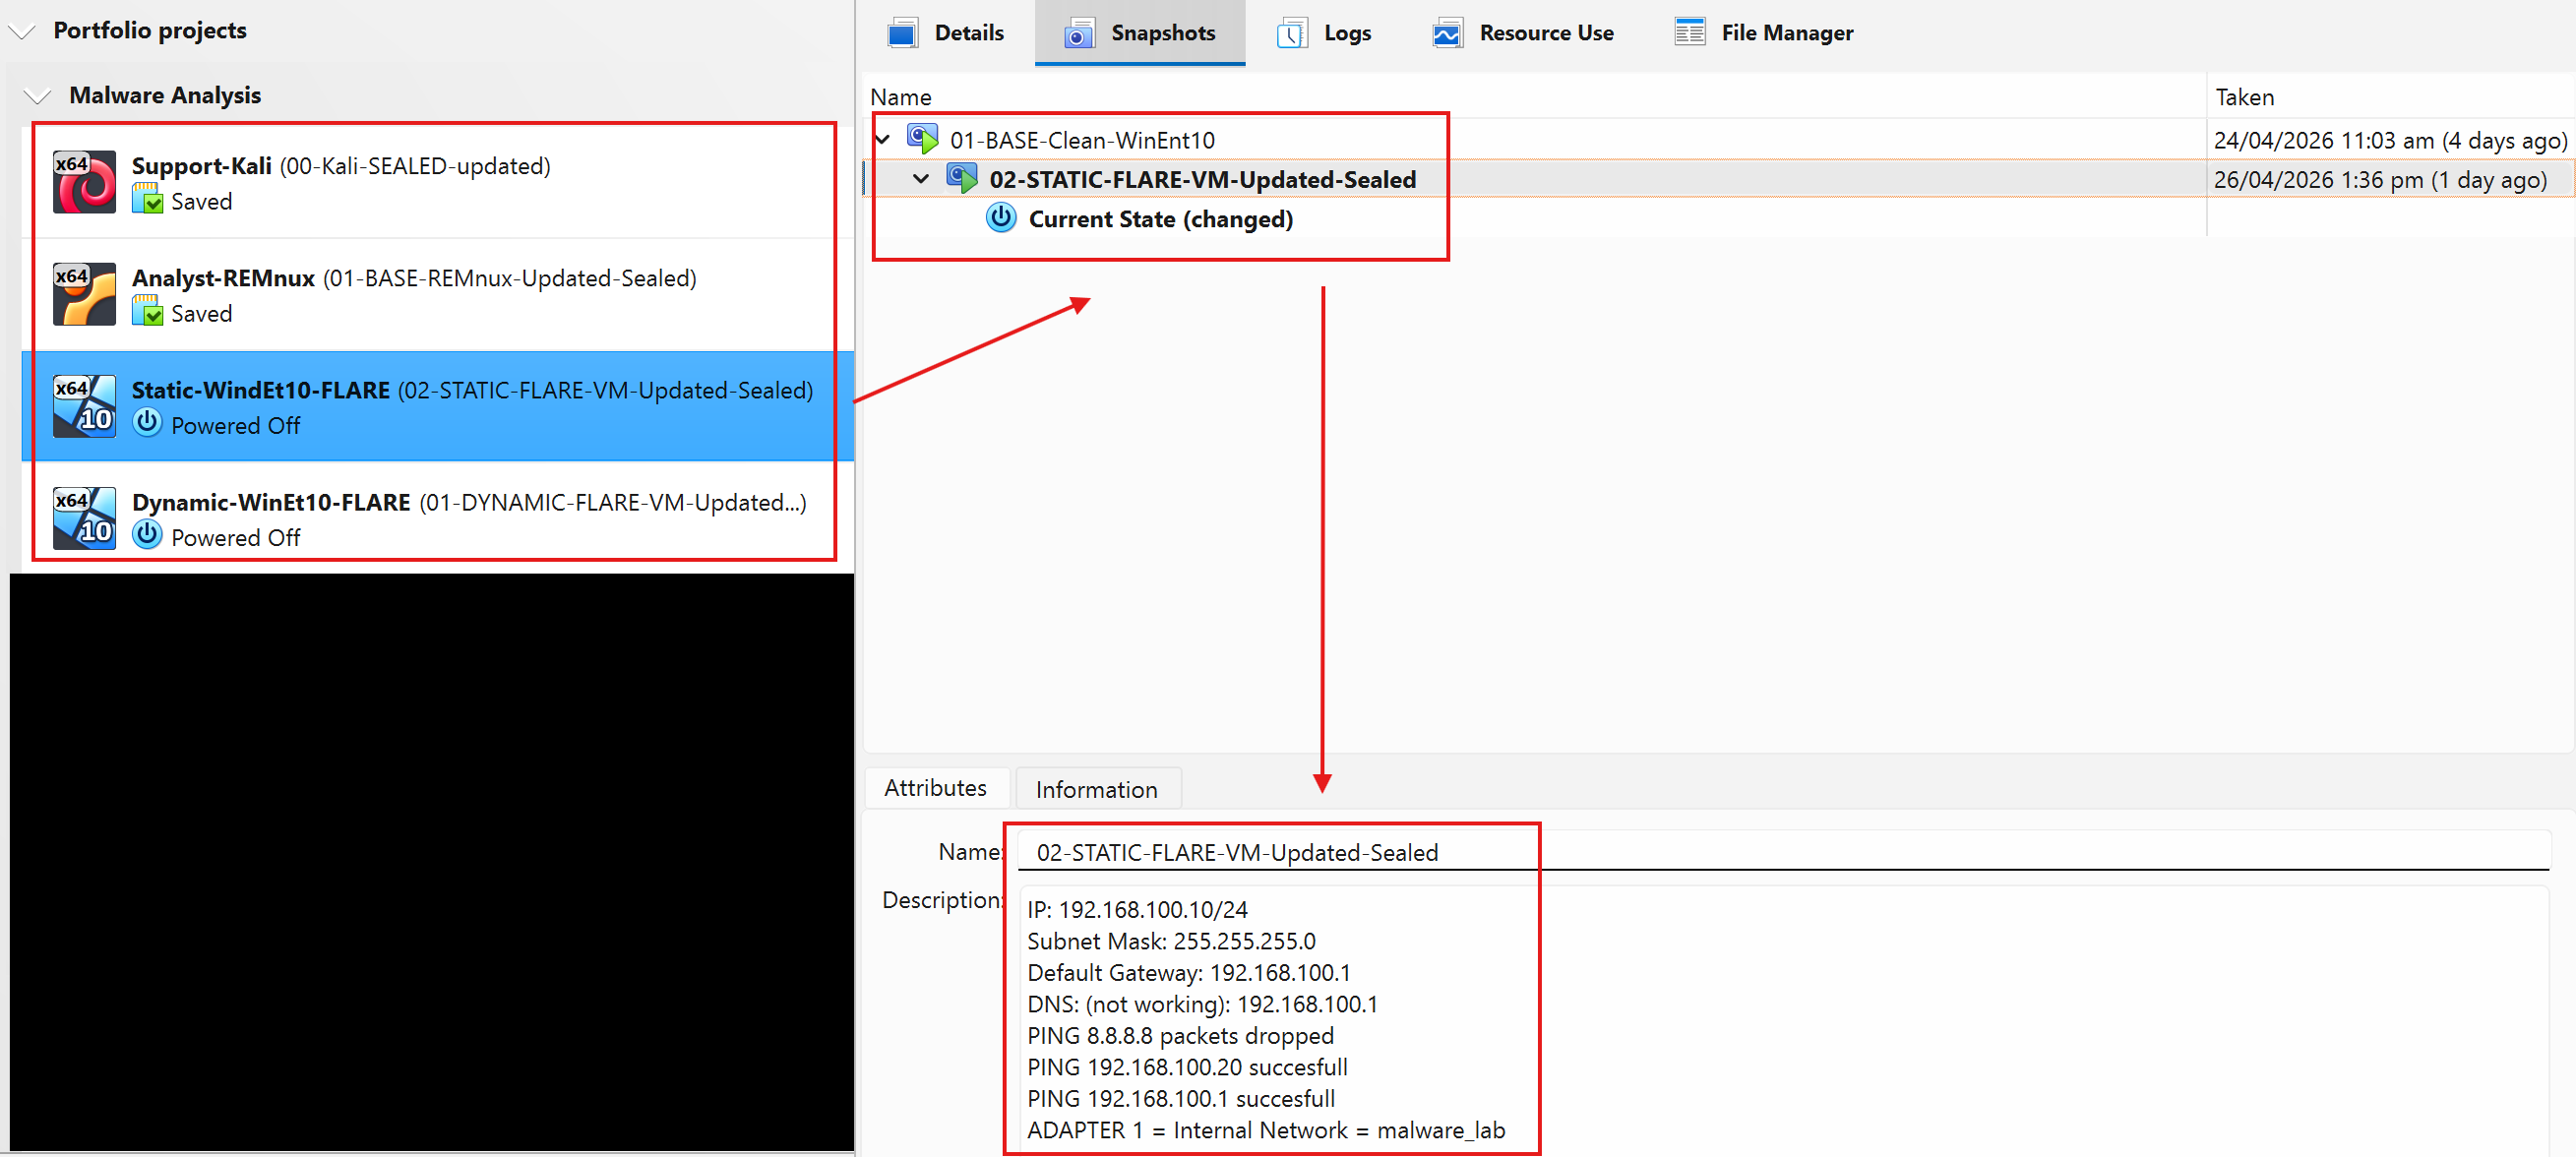
Use this as a guideline. Make sure you write down important notes to describe each Snapshot
2. Why Basic Static Analysis Comes First?
Before I describe what I did, it’s worth understanding why we start with static analysis rather than just running the file and watching what happens. This matters for the portfolio because it demonstrates that I am not just following steps blindly and I understand the reasoning behind the methodology.
Static analysis means examining a binary without executing it. As Sikorski and Honig (2012) explain, this technique allows an analyst to extract preliminary indicators of compromise (IOCs), understand file structure, and identify potential capabilities, all without ever triggering the malware’s payload. This is significant for two reasons: it is safe, and it is fast. The analyst can often determine within minutes whether a file is suspicious, what kind of threat family it belongs to, and what Windows APIs it intends to use before making any execution decision.
Kleymenov and Thabet (2019) offer a complementary perspective in Mastering Malware Analysis, noting that the distinction between static and dynamic analysis is not merely procedural but epistemological: static analysis tells you what the code says, while dynamic analysis tells you what the code does. Both are needed for a complete picture, but static always comes first precisely because it carries zero execution risk.
Sihwail et al. (2018) describe static analysis as the foundational pillar of the malware analysis pipeline, noting that it encompasses file format analysis, string extraction, import/export table inspection, and entropy measurement. Similarly, Al-Difallah et al. (2022) observe that despite the limitations of static analysis against obfuscated samples, it remains the first-response technique in both enterprise security operations and academic research environments because of its speed and safety profile.
Cucci (2024) pushes this further in Evasive Malware, specifically noting that even evasive, sophisticated malware families leave detectable static fingerprints that a trained analyst can identify before execution. This is particularly relevant for my progression because the samples I will work with initially are not obfuscated, but building the static analysis habit now means I will be applying the right workflow when I eventually face obfuscated binaries in the lab.
The workflow I am following throughout this lab series positions Static Analysis at the entry point of every sample intake, which reflects the professional standard described across all three of my primary references during the Lab setup.
flowchart TD
    A([New sample acquired]) --> B[Static Analysis\nNo execution risk]
    B --> C{Packed or\nobfuscated?}
    C -- No --> D[String extraction\nPE header analysis\nImport inspection]
    C -- Yes --> E[Unpacking\nEntropy analysis\nPacker ID]
    E --> D
    D --> F[IOC extraction\nInitial classification]
    F --> G[Dynamic Analysis\nControlled execution]
    G --> H[Behavioural findings\nNetwork artefacts\nRegistry changes]
    H --> I([Report and findings])

    style A fill:#1D9E75,color:#04342C
    style I fill:#1D9E75,color:#04342C
    style B fill:#9FE1CB,color:#04342C
    style G fill:#5DCAA5,color:#04342C
    style C fill:#FAC775,color:#412402
    style E fill:#FAC775,color:#412402
Figure 1. This is a standard malware analysis workflow you should apply from now on. Static analysis always precedes Dynamic Analysis regardless of the suspected threat type (Sikorski & Honig, 2012; Kleymenov & Thabet, 2019).
3. Sample Source Selection
One of the first decisions I had to make was where to get the malware samples from. This is not a trivial question. Downloading malware from an unknown or unverified source introduces risks that go beyond the obvious: corrupted samples, samples that have been modified or weaponised further, and samples that come with no community documentation which means no way to verify my own analysis findings. As a cybersecurity professional your zero-trust policy always must be “trust nothing, trust no one”, not even this repo.
Evaluating the following sources before deciding is fundamental:
| Source | URL | Free? | Account Required | Notes |
|---|---|---|---|---|
| MalwareBazaar | bazaar.abuse.ch | ✅ | No | Community-sourced, beginner-friendly |
| PMA Lab Samples | github.com/mikesiko | ✅ | No | Directly tied to Sikorski’s book |
| MalShare | malshare.com | ✅ | Yes | API access, large repo |
| VirusShare | virusshare.com | ✅ | Yes | Massive, less curated |
| The Zoo | github.com/ytisf/theZoo | ✅ | No | Password-protected, curated |
I chose the Practical Malware Analysis Lab Samples repository maintained by the book’s author (Sikorski & Honig, 2012) for the following reasons:
-
Aligned with bibliography. Every sample is directly referenced in the book I am studying. This means I can verify my analysis findings against documented expected outputs which is critical advantage when learning alone.
-
Documented. The samples are known quantities. Lab01-01.exe, for example, is described in detail in Chapter 1. I know what it is supposed to do before I even run a single tool. Very valuable for beginners.
-
Beginner-appropriate complexity. The Chapter 1 samples are not obfuscated or packed. Sikorski and Honig (2012) designed them specifically to introduce static analysis concepts without the added complexity of anti-analysis techniques. Kleymenov and Thabet (2019) describe this progression as essential: you need to know what a clean PE header looks like before you can recognise a malformed one.
-
Community support. The repository has been used by thousands of students and is hosted on a verified GitHub account. The hash values of the samples are published separately in the repository’s
Hashes.csvfile, allowing independent verification.
Feng et al. (2022) note that the integrity of the analysis environment is a basic requirement for producing meaningful analytical results. A corrupted or modified sample produces corrupted findings. This is why I am treating sample acquisition as a formal step with its own documentation, not just a preliminary task.
For more info refer to the following malware repository: github.com/mikesiko/PracticalMalwareAnalysis-Labs
Note: This list would be updated with other relevant repos once verified.
4. Sample Acquisition
All sample acquisition work was performed exclusively on the REMnux VM (192.168.100.1). The Windows Static VM and Windows Dynamic VM were running but were not used at this stage. This matches the intake workflow described by Sikorski and Honig (2012): the analyst machine handles all sample intake and initial verification before anything reaches an execution environment.
The workflow I followed is shown below:
flowchart LR
    A[REMnux\n192.168.100.1] -->|Download via NAT| B[GitHub Repo\nCloned]
    B --> C[Archive extracted\non REMnux only]
    C --> D[Hash verified\nIOC recorded]
    D -->|SCP transfer\nzip -P infected| E[Win Static VM\n192.168.100.10]
    E --> F[Static Analysis\nbegins]

    style A fill:#9FE1CB,color:#04342C
    style E fill:#B5D4F4,color:#042C53
    style F fill:#E6F1FB,color:#042C53
Figure 2. Your REMnux serves as the acquisition and verification stage; Windows Static VM would always receive only the packaged, verified sample (Sikorski & Honig, 2012).
4.1 Lab Directory Structure Setup
The first thing I did was create a clean, organised directory structure on REMnux. This might seem like a trivial step, but it matters for a portfolio because disorganised lab work produces disorganised reports. Organisation across labs would allow me to return to the same samples multiple times over a project.
mkdir -p ~/malware-lab/{samples,reports,tools}
ls ~/malware-lab/
The three-folder structure serves a specific purpose, but you can set up your lab however you want:
| Folder | Purpose |
|---|---|
samples/ |
Holds all archived, password-protected malware packages. Raw samples live here and are never extracted directly. |
reports/ |
All analysis notes, hash records, and findings documents per sample |
tools/ |
Any additional scripts, YARA rules, or custom utilities developed during the project |

4.2 Cloning the Repository
With the directory structure ready, I downloaded the sample repository from GitHub directly onto REMnux using git clone. This uses REMnux’s NAT adapter (enp0s3, 10.0.2.15) which has internet access.
cd ~/malware-lab/samples
git clone https://github.com/mikesiko/PracticalMalwareAnalysis-Labs.git
After cloning, I navigated into the repository and listed its contents:
cd ~/malware-lab/samples/PracticalMalwareAnalysis-Labs
ls -lh
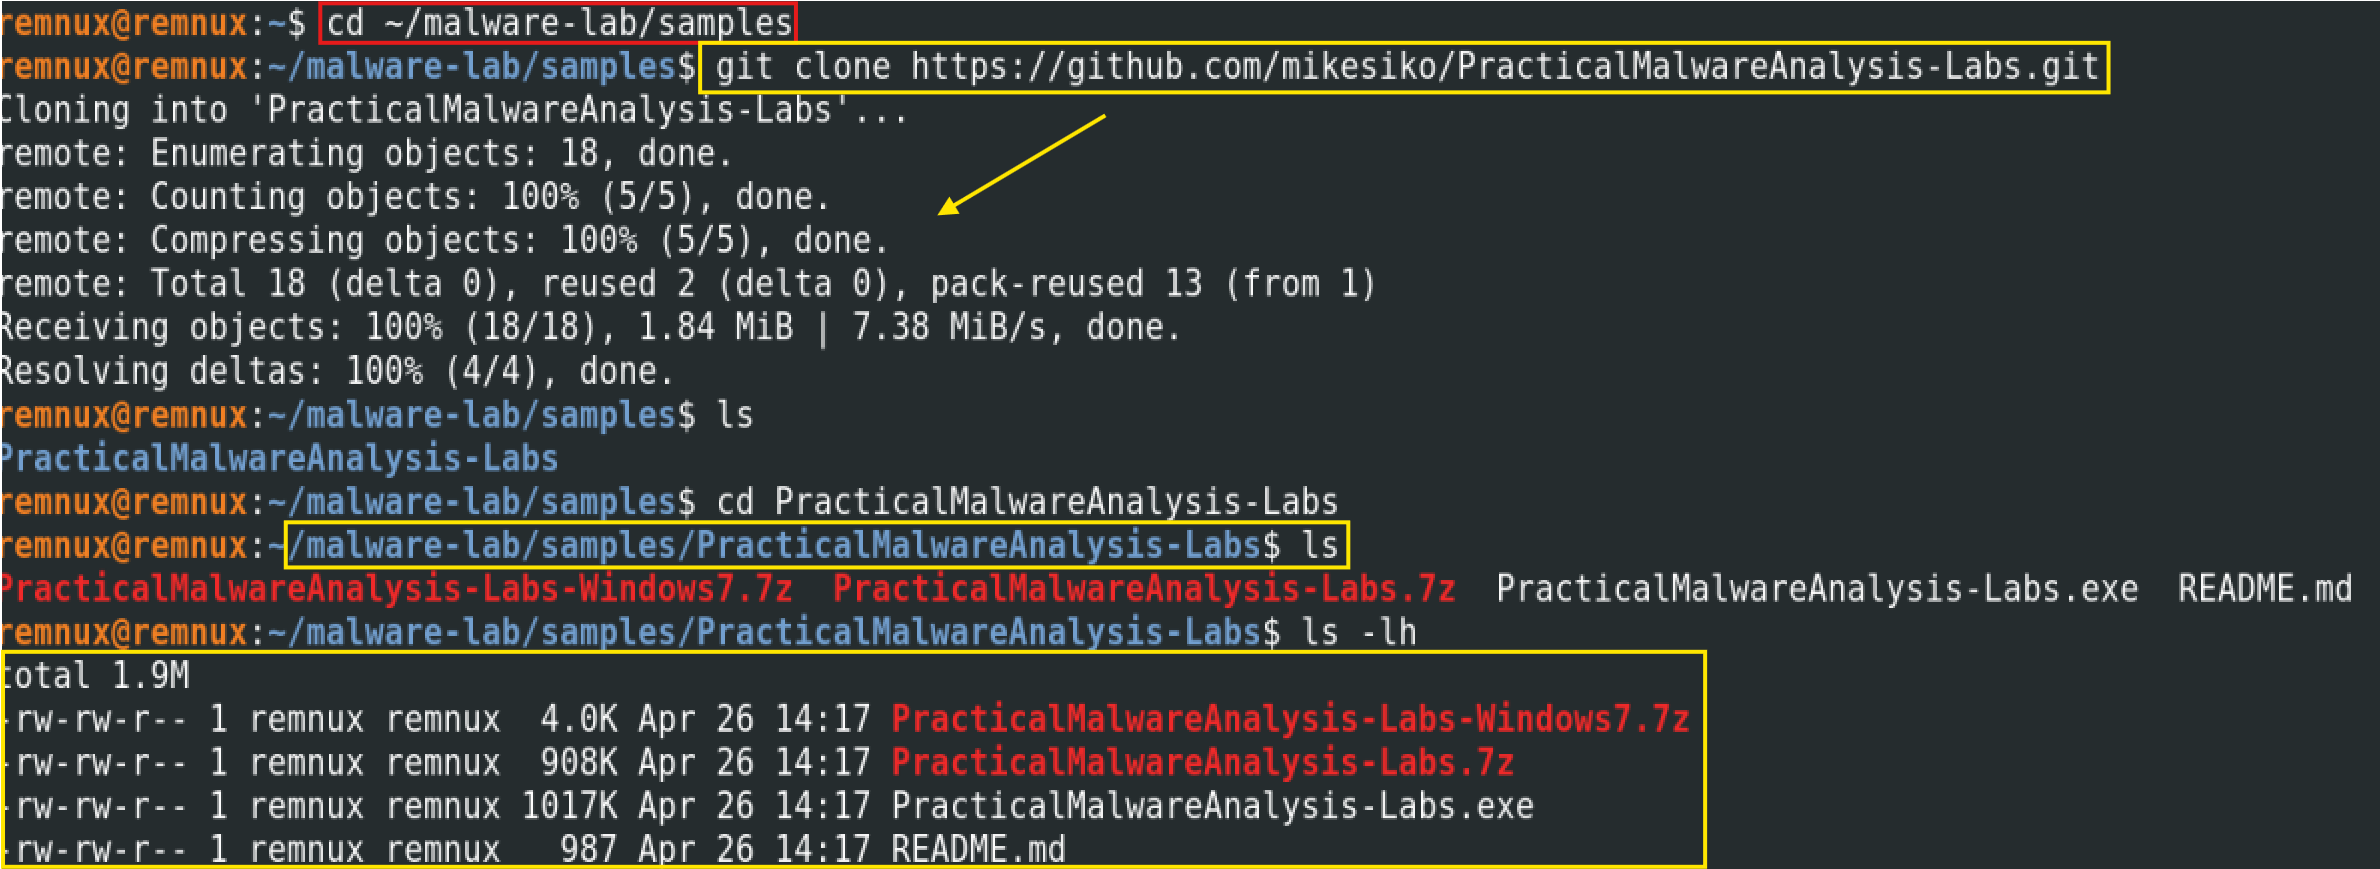
This is the point where I first ran into unexpected situation. I had assumed the repository would contain the individual lab binaries files (e.g., Lab01-01.exe directly accessible), as many online guides suggest. Instead, the repository contains compressed archives — specifically a .7z file and a self-extracting .exe. The README clarified the situation:
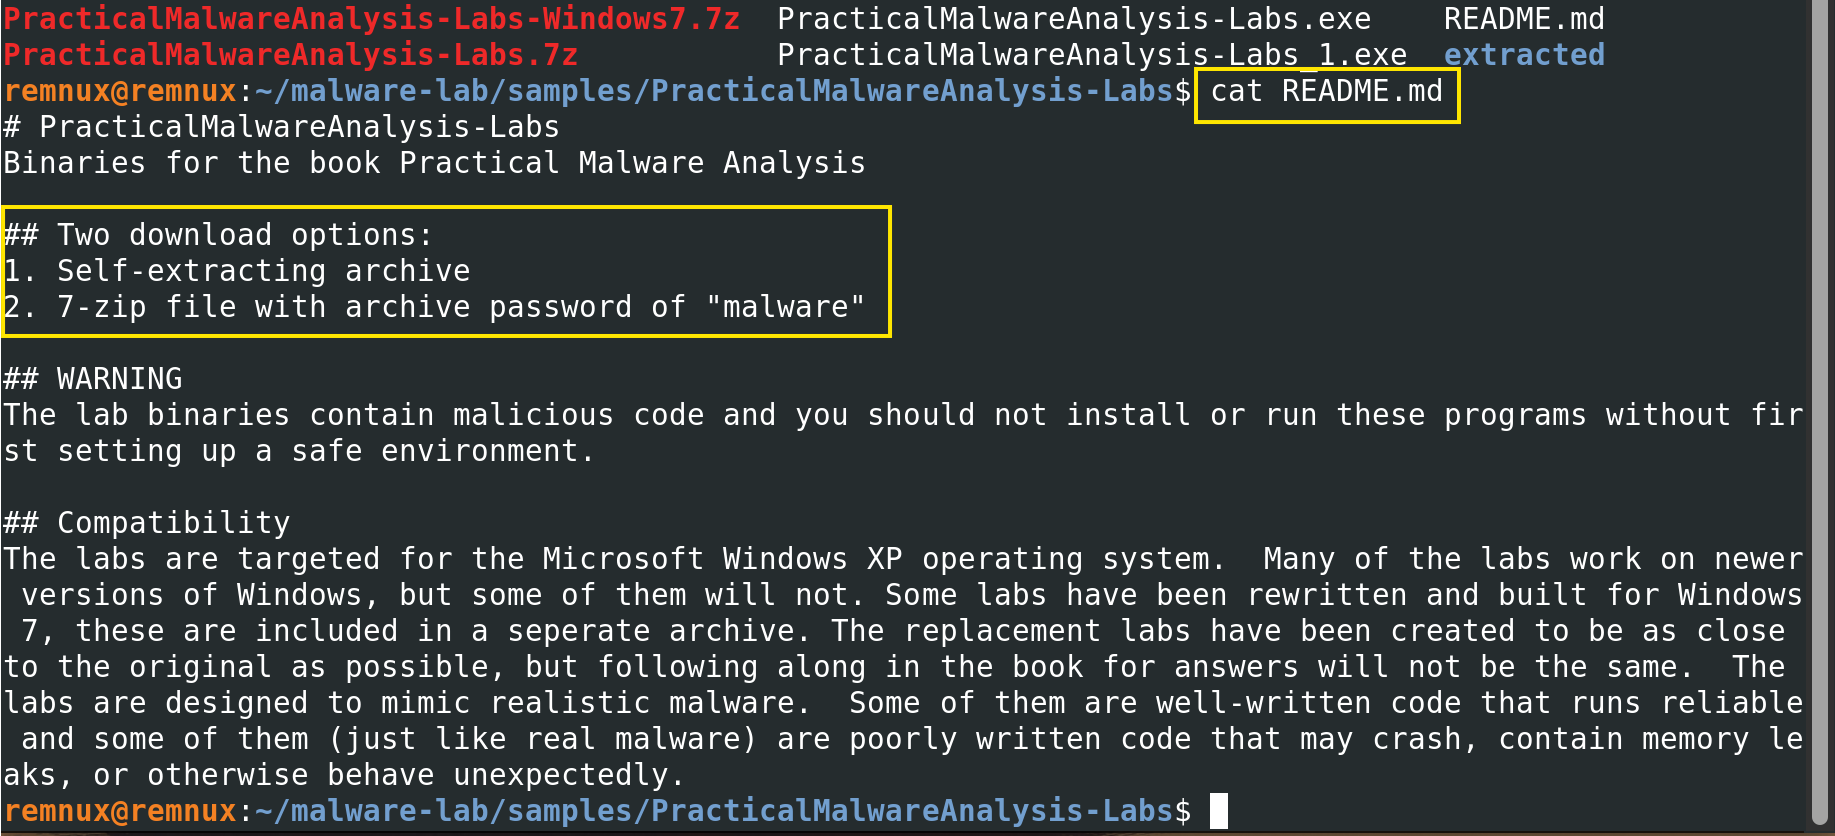
Two archives were available: the standard labs (targeting Windows XP) and a Windows 7 variant. I targeted the standard archive PracticalMalwareAnalysis-Labs.7z first as this directly corresponds to Chapter 1 of the book.
4.3 First Extraction Attempt (7zip issues)
My first instinct was to use 7zip, since the archive has a .7z extension. I installed it and ran the extraction command:
sudo apt install p7zip-full -y
7z x PracticalMalwareAnalysis-Labs.7z -pmalware
7zip recognised the file and began scanning. The extraction output showed it reading the archive header and then presented an interactive prompt asking whether to replace the existing PracticalMalwareAnalysis-Labs.exe with the version from the archive. I pressed u to auto-rename and allow both versions to coexist.

The immediate result was Everything is Ok with a size output confirming about 1 MB extracted. However, running find to locate the lab binaries returned nothing:

Running ls again showed the same files as before plus what appeared to be an additional .exe file. What 7zip had actually done was extract the self-extracting installer executable from inside the .7z archive — not the individual lab binaries. The actual samples were one layer deeper, compressed inside a RAR-format self-extracting archive.
This was confirmed when I ran 7zip against the extracted .exe:
7z x PracticalMalwareAnalysis-Labs.exe -pmalware -o./extracted/
7zip correctly identified the file type as RAR (you can see Type = Rar in the output) and began listing the sample paths it could see, including Chapter_1L/Lab01-01.dll, Chapter_1L/Lab01-01.exe, and all other chapter lab binaries, but then threw a wall of errors:
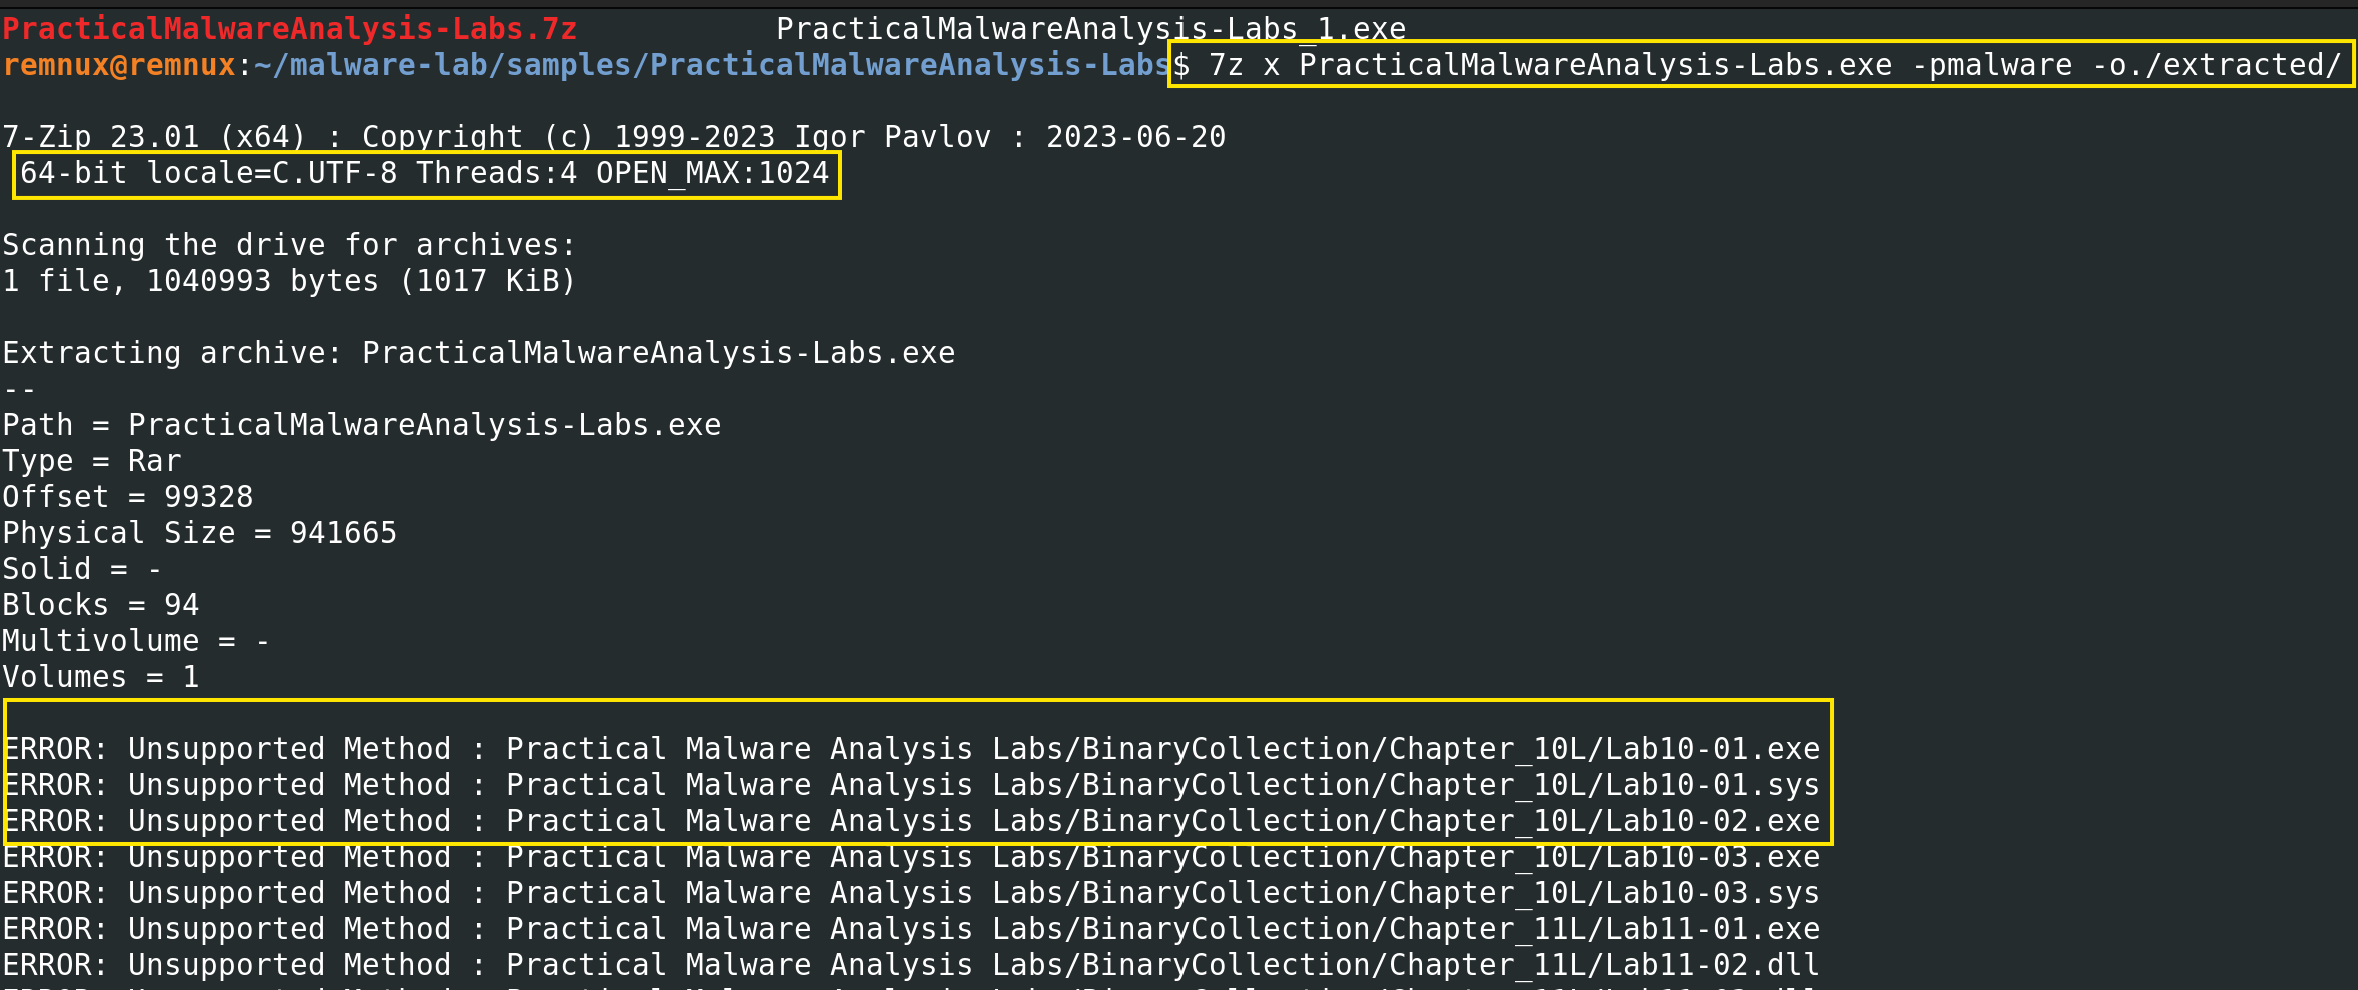
Sub items Errors: 73
Archives with Errors: 1
Note: Extracted the files within -o./extracted/ folder.
7zip could see the files but could not decompress them. The archive used a RAR compression method — specifically a version of RAR compression that the open-source 7zip implementation does not fully support. This is a known limitation of 7zip with certain RAR archives: it can read the index but cannot extract the content (Contreras et al., 2024). The fix required switching to the official unrar tool from RARLAB.
4.4 Second Extraction Attempt (unrar)
I installed unrar and attempted the extraction. If successfully you would see a disclaimer before accepting it.:
sudo apt install unrar -y
unrar x PracticalMalwareAnalysis-Labs.exe malware ./extracted/
Note: Remember to locate yourself within ~/malware-lab/samples/ directory. extracted folder lives within PracticalMalwareAnalysis.
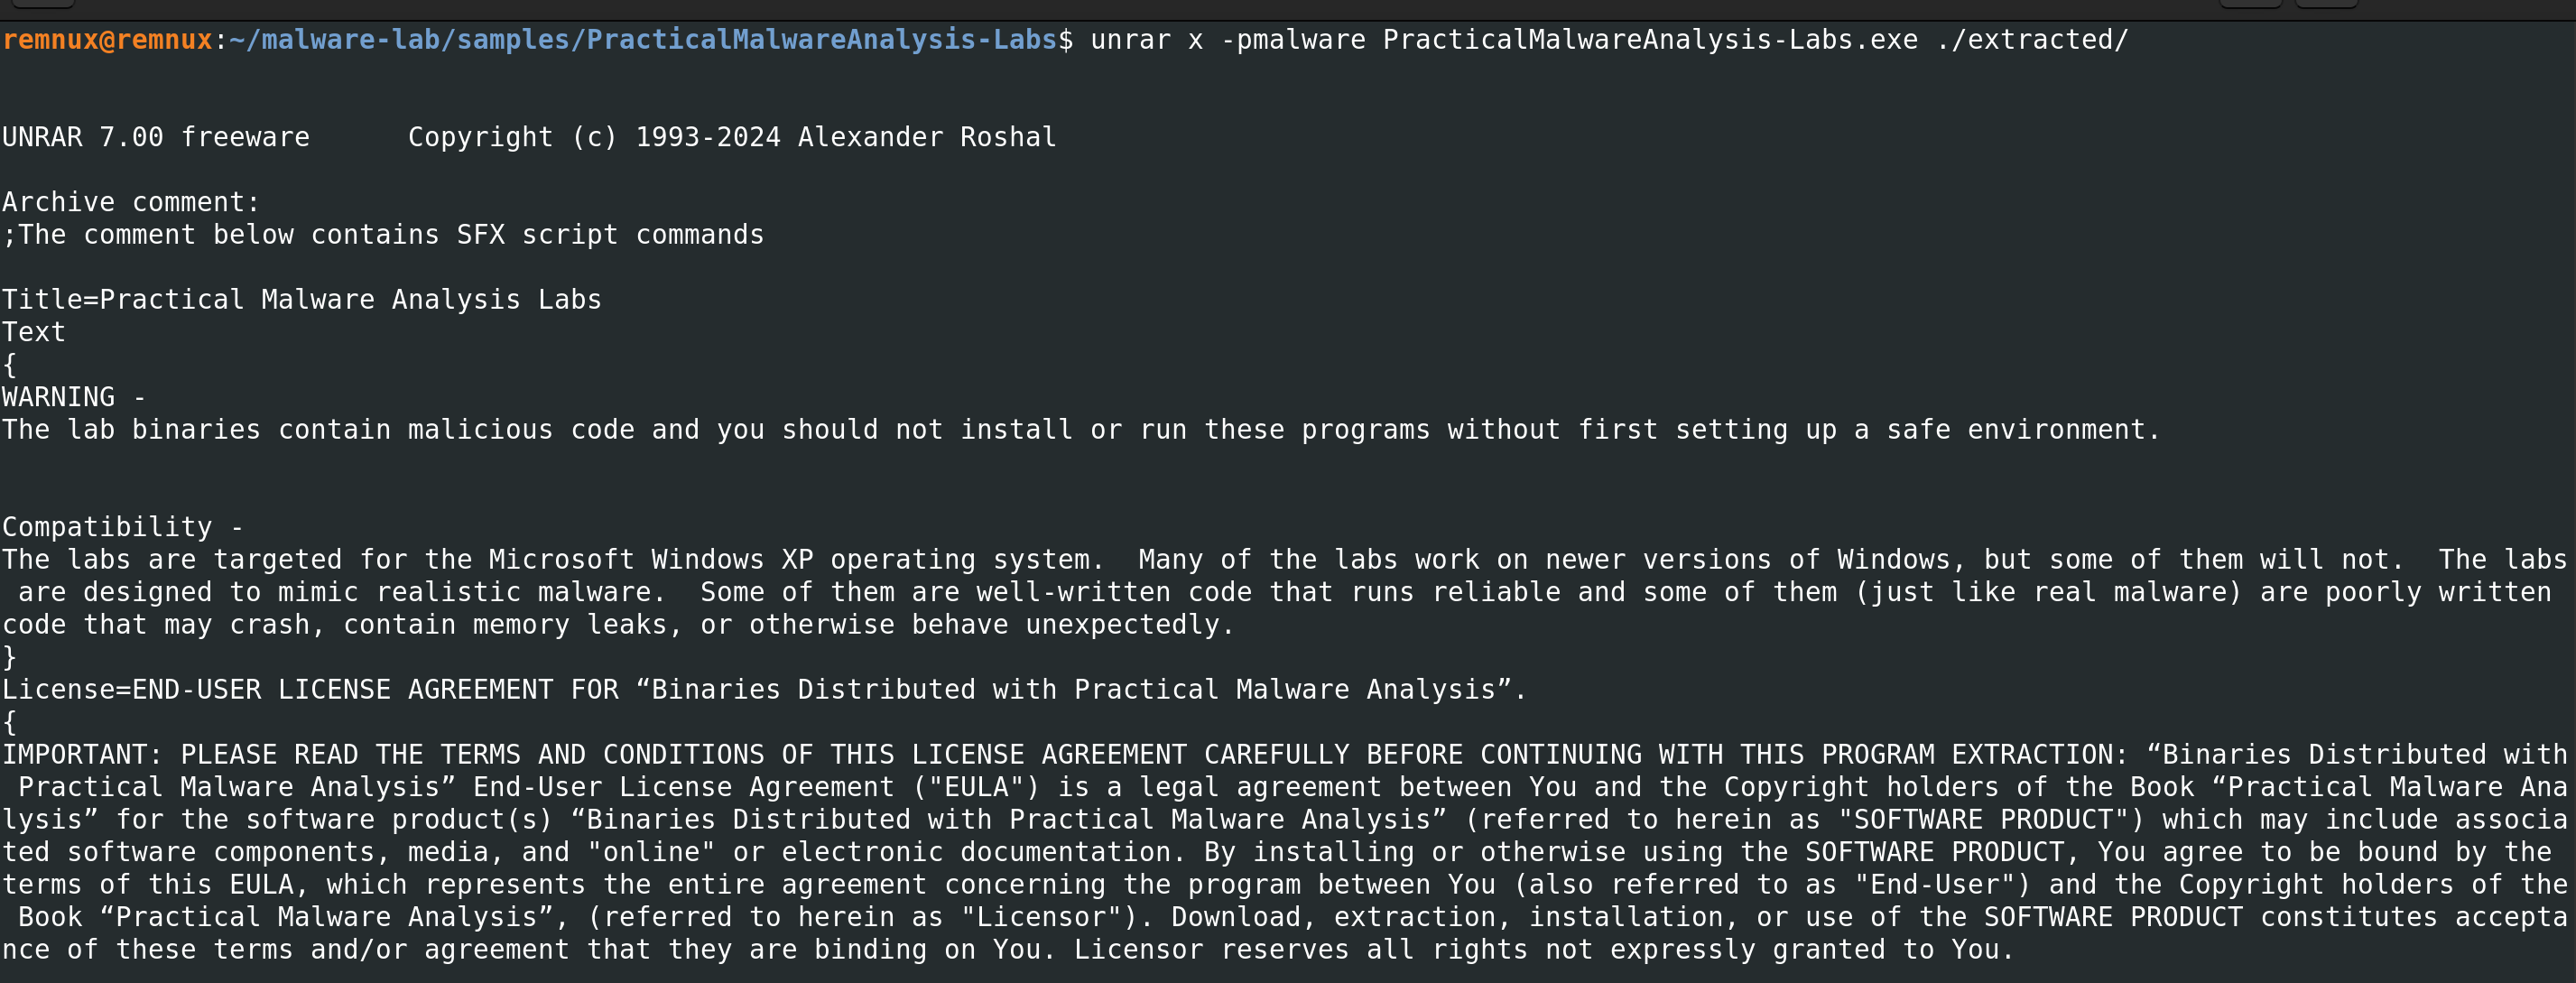
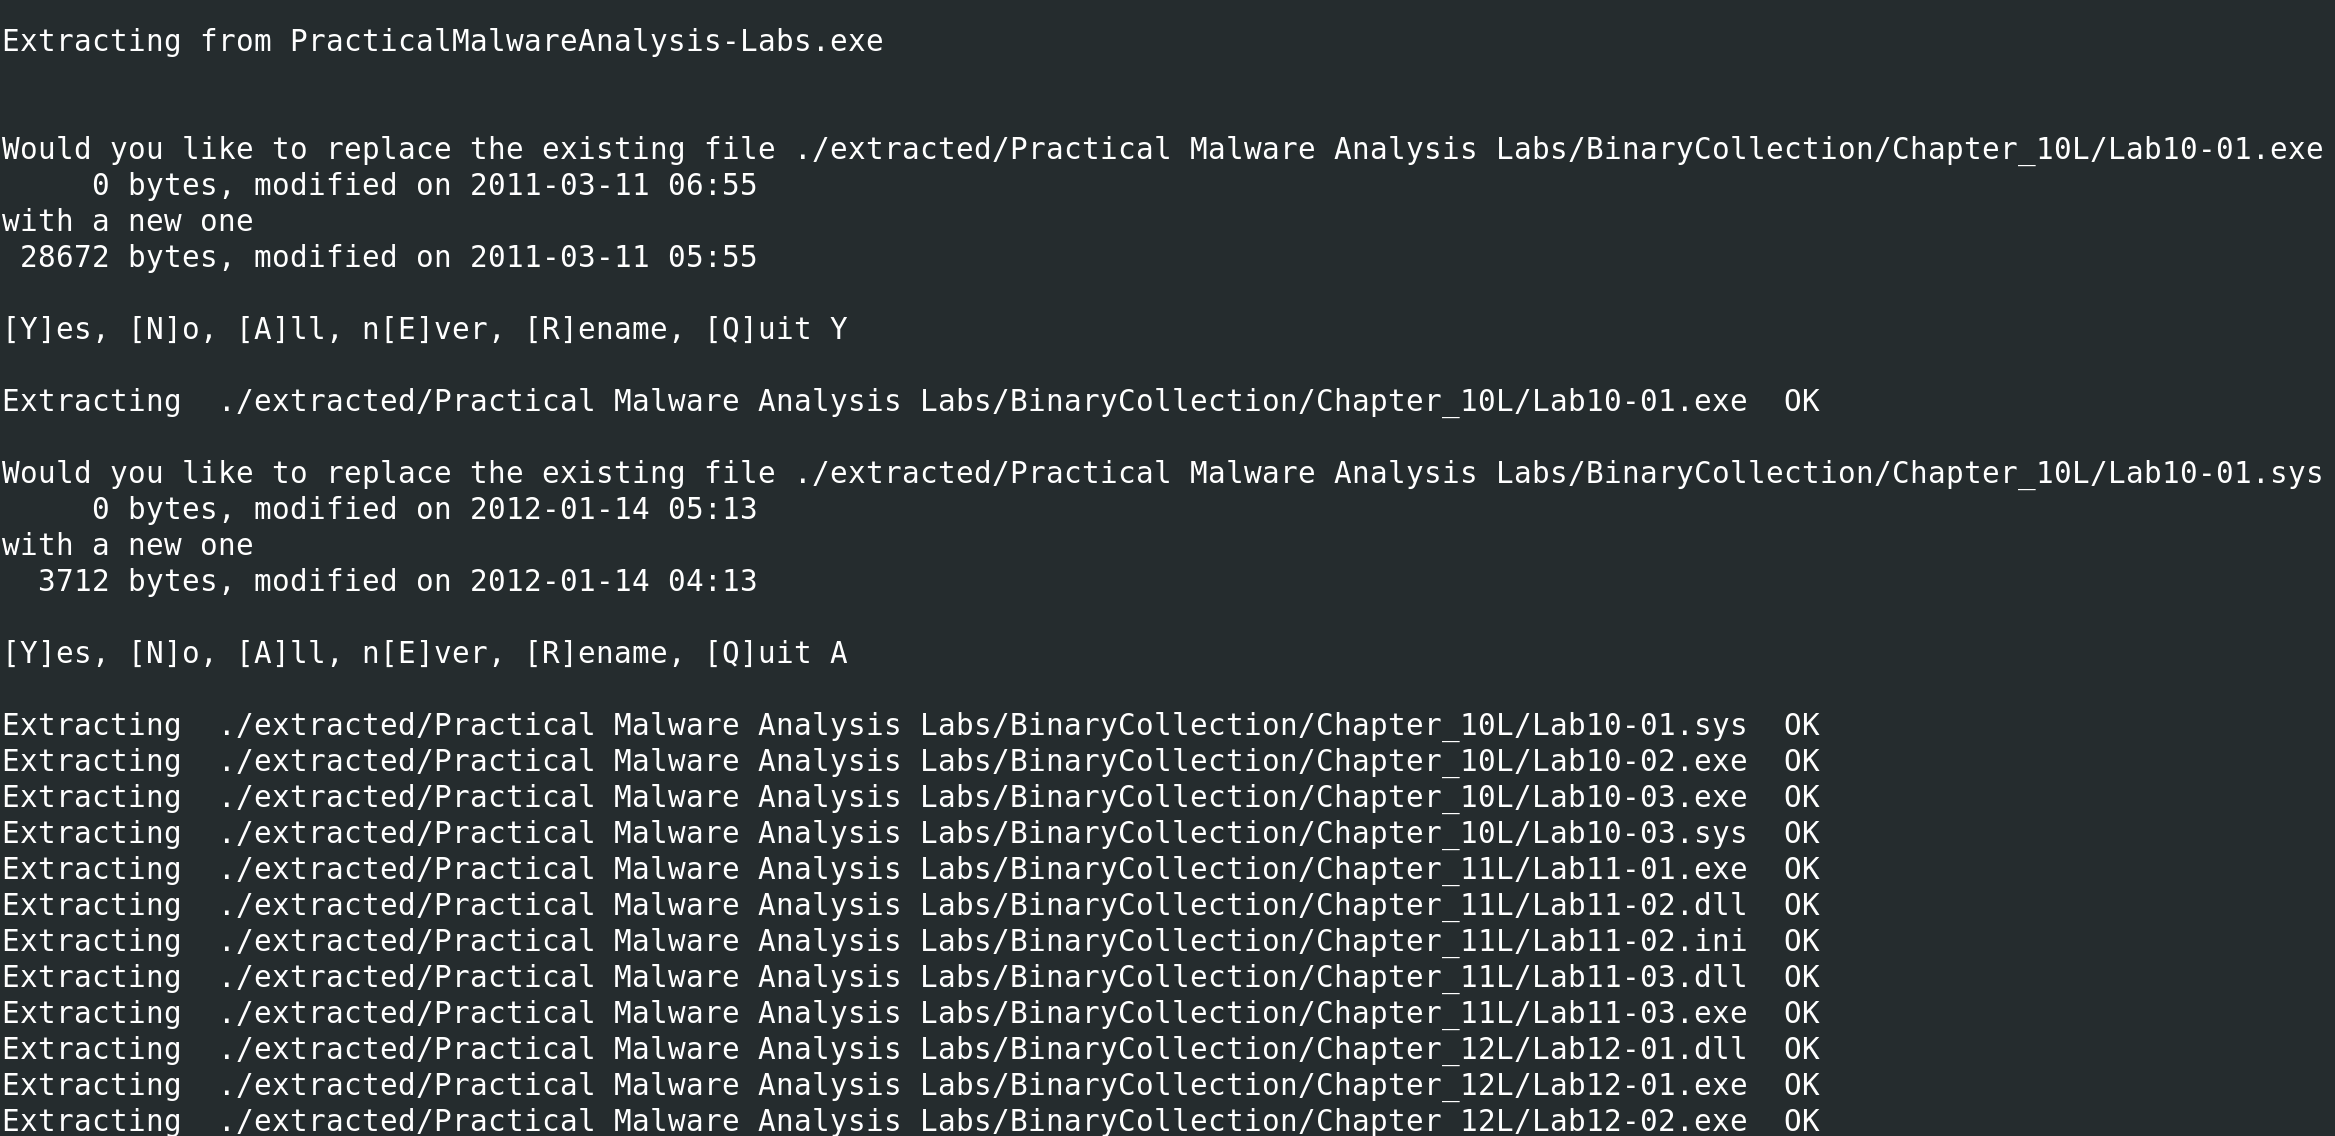
unrar correctly extracted the archive’s, which showed OK warnings.
4.5 Sample Confirmation
After the successful extraction, I ran a search to confirm that the specific Chapter 1 samples were present and accessible:
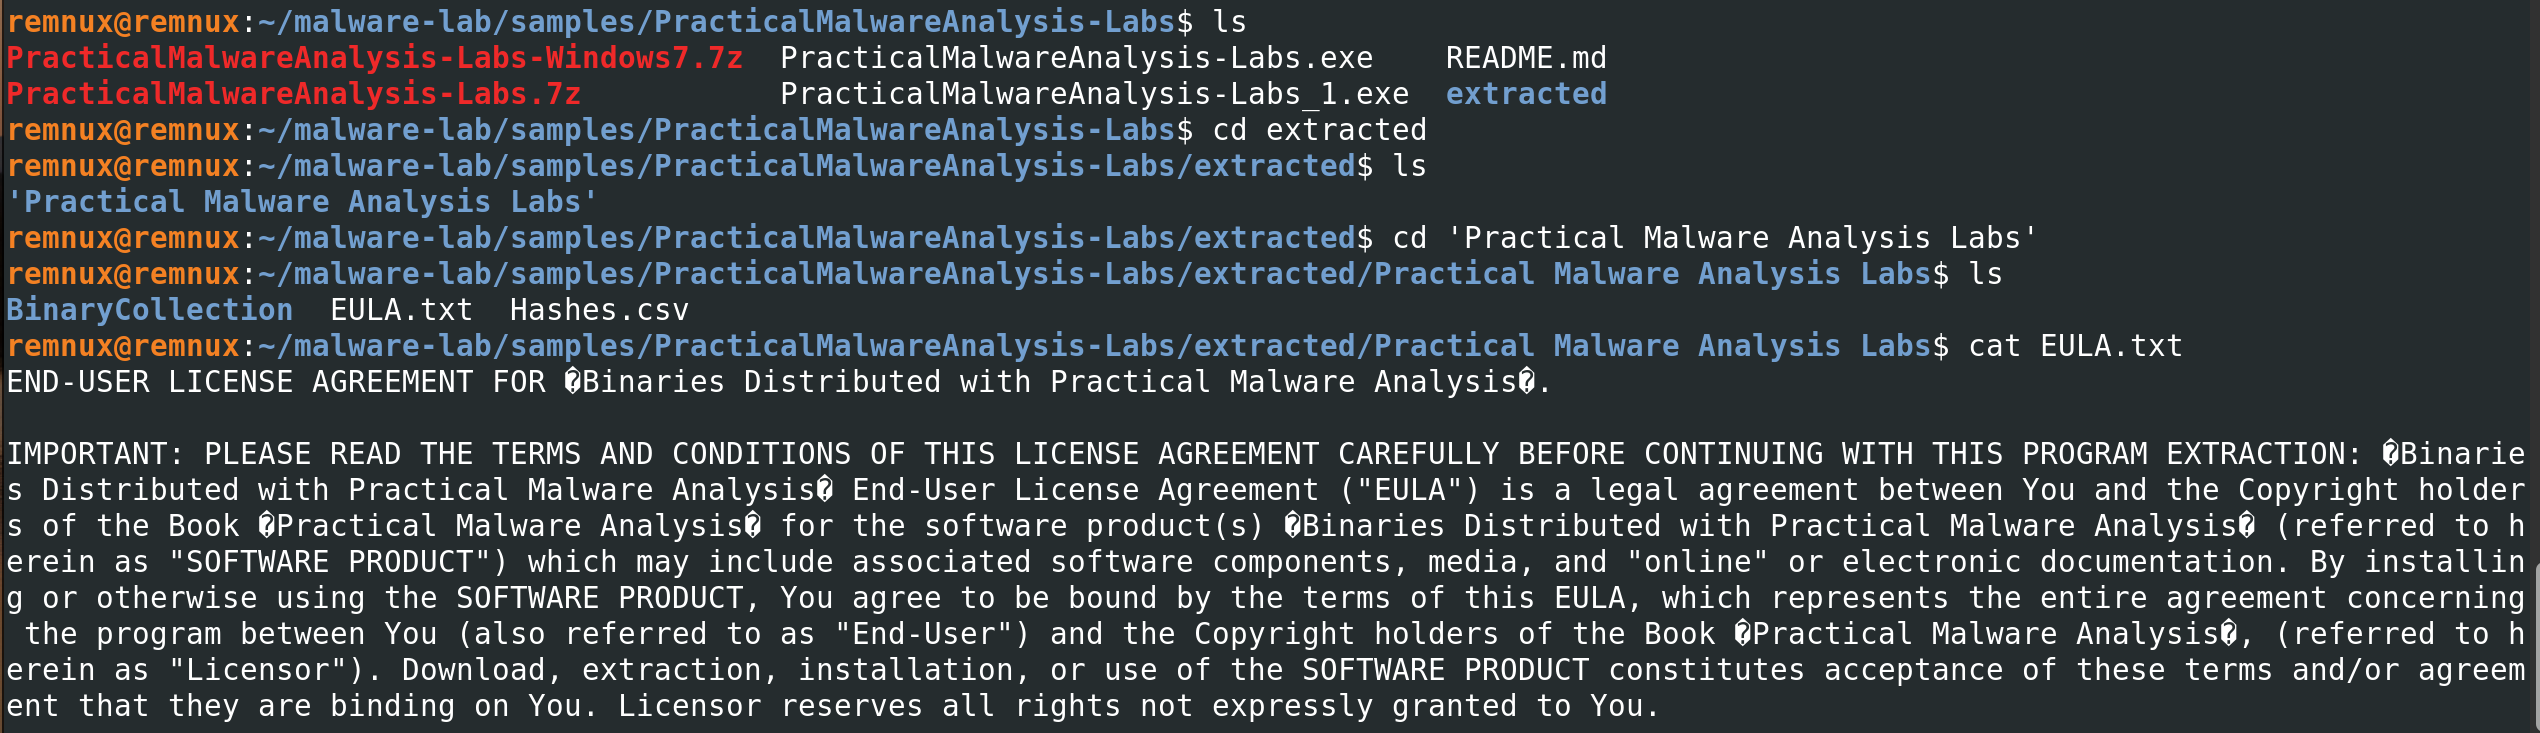
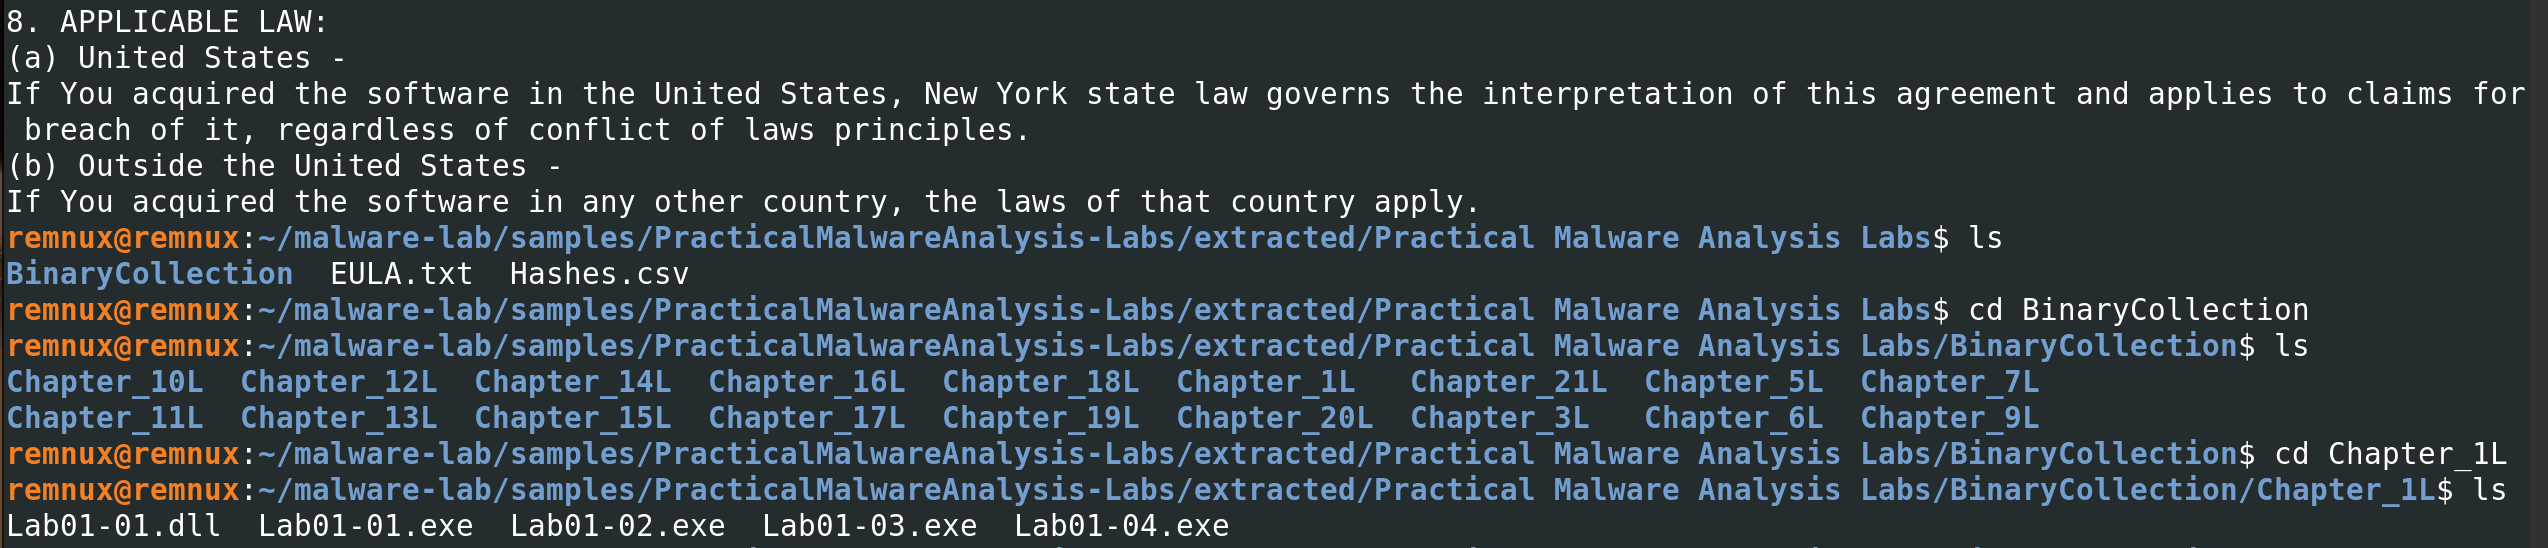
My primary targets Lab01-01.exe and Lab01-01.dll were confirmed present after diving into extracted directory. These two files are the subject of Chapter 1’s lab exercises in Sikorski and Honig (2012). The .exe is the main binary and the .dll is a companion library that the executable loads at runtime. Both must be present for a complete analysis.
My full directory structure on REMnux at this point looks like this:
~/malware-lab/
├── samples/
│   └── PracticalMalwareAnalysis-Labs/
│       ├── PracticalMalwareAnalysis-Labs.7z
│       ├── PracticalMalwareAnalysis-Labs.exe
│       ├── PracticalMalwareAnalysis-Labs_1.exe
│       ├── PracticalMalwareAnalysis-Labs-Windows7.7z
│       ├── README.md
│       └── extracted/
│           └── Practical Malware Analysis Labs/
│               └── BinaryCollection/
│                   ├── Chapter_1L/
│                   │   ├── Lab01-01.exe   ← TARGET
│                   │   ├── Lab01-01.dll   ← TARGET
│                   │   ├── Lab01-02.exe
│                   │   ├── Lab01-03.exe
│                   │   └── Lab01-04.exe
│                   ├── Chapter_3L/
│                   ├── Chapter_5L/
│                   └── ... (all chapters)
├── reports/
│   └── Lab01-01-notes.txt   ← the next
└── tools/
5. Self-Reflection report
This section is something I want to commit to doing for every lab in this repository, because independent learning without a professor’s feedback means I need to be my own critic.
The network isolation setup from Lab 01 paid off immediately here and REMnux was the only machine touching the internet, the Windows VMs had no external route, and the internal network was verified before any sample was downloaded. That groundwork made this phase feel genuinely safe rather than just theoretically safe.
The extraction process took three attempts, which was frustrating in the moment but useful in retrospect. The first problem was 7zip which doesn’t fully supports the RAR compression method. The second problem was passing the password as a positional argument instead of a flag, this was a simple syntax error. I recorded both failures in detail here because I think they are more instructive than if everything had worked on the first try. Troubleshooting is a core analyst skill. Cucci (2024) makes the point that malware analysts who cannot systematically debug their own environment cannot systematically debug malware behaviour either. Both require the same patient, hypothesis-driven approach.
Even this early stage, before any analysis tool has touched the sample, involves a non-trivial amount of decision-making and technical judgement: which source to trust, which tool to use, how to verify integrity, how to contain the sample during transit. I am starting to understand why the field treats sample intake as a formal discipline.
My goal for this lab series is to build competency across threat intelligence, incident response, and reverse engineering. This phase primarily serves the threat intelligence track, specifically the sample intake and IOC seeding process that feeds into everything else. But it also serves a broader meta-goal: developing the habit of documenting everything, even the failures. A portfolio that only shows successful commands is not a useful portfolio. This entry documents my process honestly, and I think that matters more to a prospective employer than any individual command output. Thanks for reading.
8. References
Al-Difallah, M., Souri, A., & Rahmani, A. M. (2022). Malware detection issues, challenges, and future directions: A survey. Applied Sciences, 12(17), 8482. https://doi.org/10.3390/app12178482
Contreras, C., Baker, R., Gutiérrez, A., & Cerda, J. (2024). Static malware analysis using low-parameter machine learning models. Computers, 13(3), 59. https://doi.org/10.3390/computers13030059
Cucci, K. (2024). Evasive malware: A field guide to detecting, analyzing, and defeating advanced threats. No Starch Press.
Feng, R., Qiu, H., Liu, J., & Wang, C. (2022). Enhancing malware analysis sandboxes with emulated user behavior. Computers & Security, 115, 102613. https://doi.org/10.1016/j.cose.2022.102613
Kleymenov, A., & Thabet, A. (2019). Mastering malware analysis: The complete malware analyst’s guide to combating malicious software, APT, cybercrime, and IoT attacks. Packt Publishing.
Raj, R. R., Naveen, S., Subhikshan, R., & Tarun, S. (2024). Malware analysis using sandbox [Conference paper]. SSRN. https://papers.ssrn.com/sol3/papers.cfm?abstract_id=4708146
Sihwail, R., Omar, K., & Ariffin, K. A. Z. (2018). A survey on malware analysis techniques: Static, dynamic, hybrid and memory analysis. International Journal on Advanced Science, Engineering and Information Technology, 8(4-2), 1662–1671. https://doi.org/10.18517/ijaseit.8.4-2.6473
Sikorski, M., & Honig, A. (2012). Practical malware analysis: The hands-on guide to dissecting malicious software. No Starch Press.
Next entry: Lab 02 — Hash Verification and Static VM Transfer ✅ Previous entry: Lab 01 — Troubleshooting Log