Lab 02c — SIEM Integration & Network Simulation Setup
Date: 01–20 May 2026
Status: ✅ Completed
Module: Lab Infrastructure — SIEM, Fake Internet, DNS Interception
| Related: Lab 02b — Hash Verification & Threat Intelligence | Lab 03 — Static Analysis: String Extraction |
1. Overview
This detailed repository covers the infrastructure additions I made to the malware analysis lab before dynamic analysis begins. Two major components were added:
-
Wazuh SIEM — a dedicated Ubuntu 24 LTS VM running the Wazuh SIEM (manager, indexer, dashboard). Agents were deployed on both Windows FLARE-VM machines to monitor file integrity, registry changes, process creation, and network events in real time. The goal is to create a proper SOC environment.
-
Fake Internet — REMnux was configured to simulate internet services using INetSim (HTTP, HTTPS, SMTP, FTP) and DNSChef (DNS interception). Every domain the malware queries resolves back to REMnux IP Address, and every HTTP/HTTPS connection receives a fake response — all without any real internet access from the Windows VMs.
This infrastructure is not optional. Without it, malware executed on the Dynamic VM would either fail (no DNS response), behave differently (since it has anti-sandbox checkers), or produce incomplete forensic evidence. With it, every network attempt is logged, every file change is alerted, and every DNS query is captured.
2. SOC infrastructure
When Lab01-01.exe executes during dynamic analysis, the following sequence will occur:
Malware queries: "where is my C2 server?"

DNSChef intercepts → returns REMnux VM IP address

Malware connects via HTTP to [REMnux VM IP address]:80

INetSim responds with fake HTTP content

Wazuh agent detects:

  → new file created in System32 (kerne132.dll)

  → IAT patching of executables

  → network connection attempt

  → registry modification

All events forwarded to Wazuh dashboard at [Dynamic VM IP address]
All events get registered on Wireshark running silently
in the background on REMnux
3. Final Lab Topology
graph TD

    subgraph malware_lab["malware_lab Internal Network (192.168.100.0/24)"]

        R["REMnux — 192.168.100.1\nAnalyst Hub\nINetSim + DNSChef\nTraffic Capture"]

        S["Windows Static FLARE-VM\n192.168.100.10\nStatic Analysis\nWazuh Agent"]

        D["Windows Dynamic FLARE-VM\n192.168.100.20\nMalware Execution\nWazuh Agent"]

        W["Wazuh SIEM\n192.168.100.30\nManager + Indexer\n+ Dashboard"]

    end


    subgraph nat["NAT — Internet (updates only)"]

        R2["REMnux enp0s3 — 10.0.2.15"]

        W2["Wazuh enp0s3 — 10.0.2.15"]

        K["Kali Linux — 10.0.2.15"]

    end


    S -->|"Wazuh agent :1514"| W

    D -->|"Wazuh agent :1514"| W

    S -->|"DNS queries :53"| R

    D -->|"DNS queries :53"| R

    S -->|"HTTP/HTTPS :80/:443"| R

    D -->|"HTTP/HTTPS :80/:443"| R
Figure 1. Final lab network topology with Wazuh SIEM and fake internet services.
4 — Wazuh SIEM Setup
4.1.1 Installation
Wazuh was installed on a dedicated Ubuntu 24.04 LTS VM (4GB RAM, hostname wazuh-siem).
curl -sO https://packages.wazuh.com/4.14/wazuh-install.sh && sudo bash ./wazuh-install.sh -a
After installation, disable the Wazuh repository to prevent unintended updates:
sed -i "s/^deb /#deb /" /etc/apt/sources.list.d/wazuh.list

apt update
⚠️ Save the generated password immediately. It is only shown once.
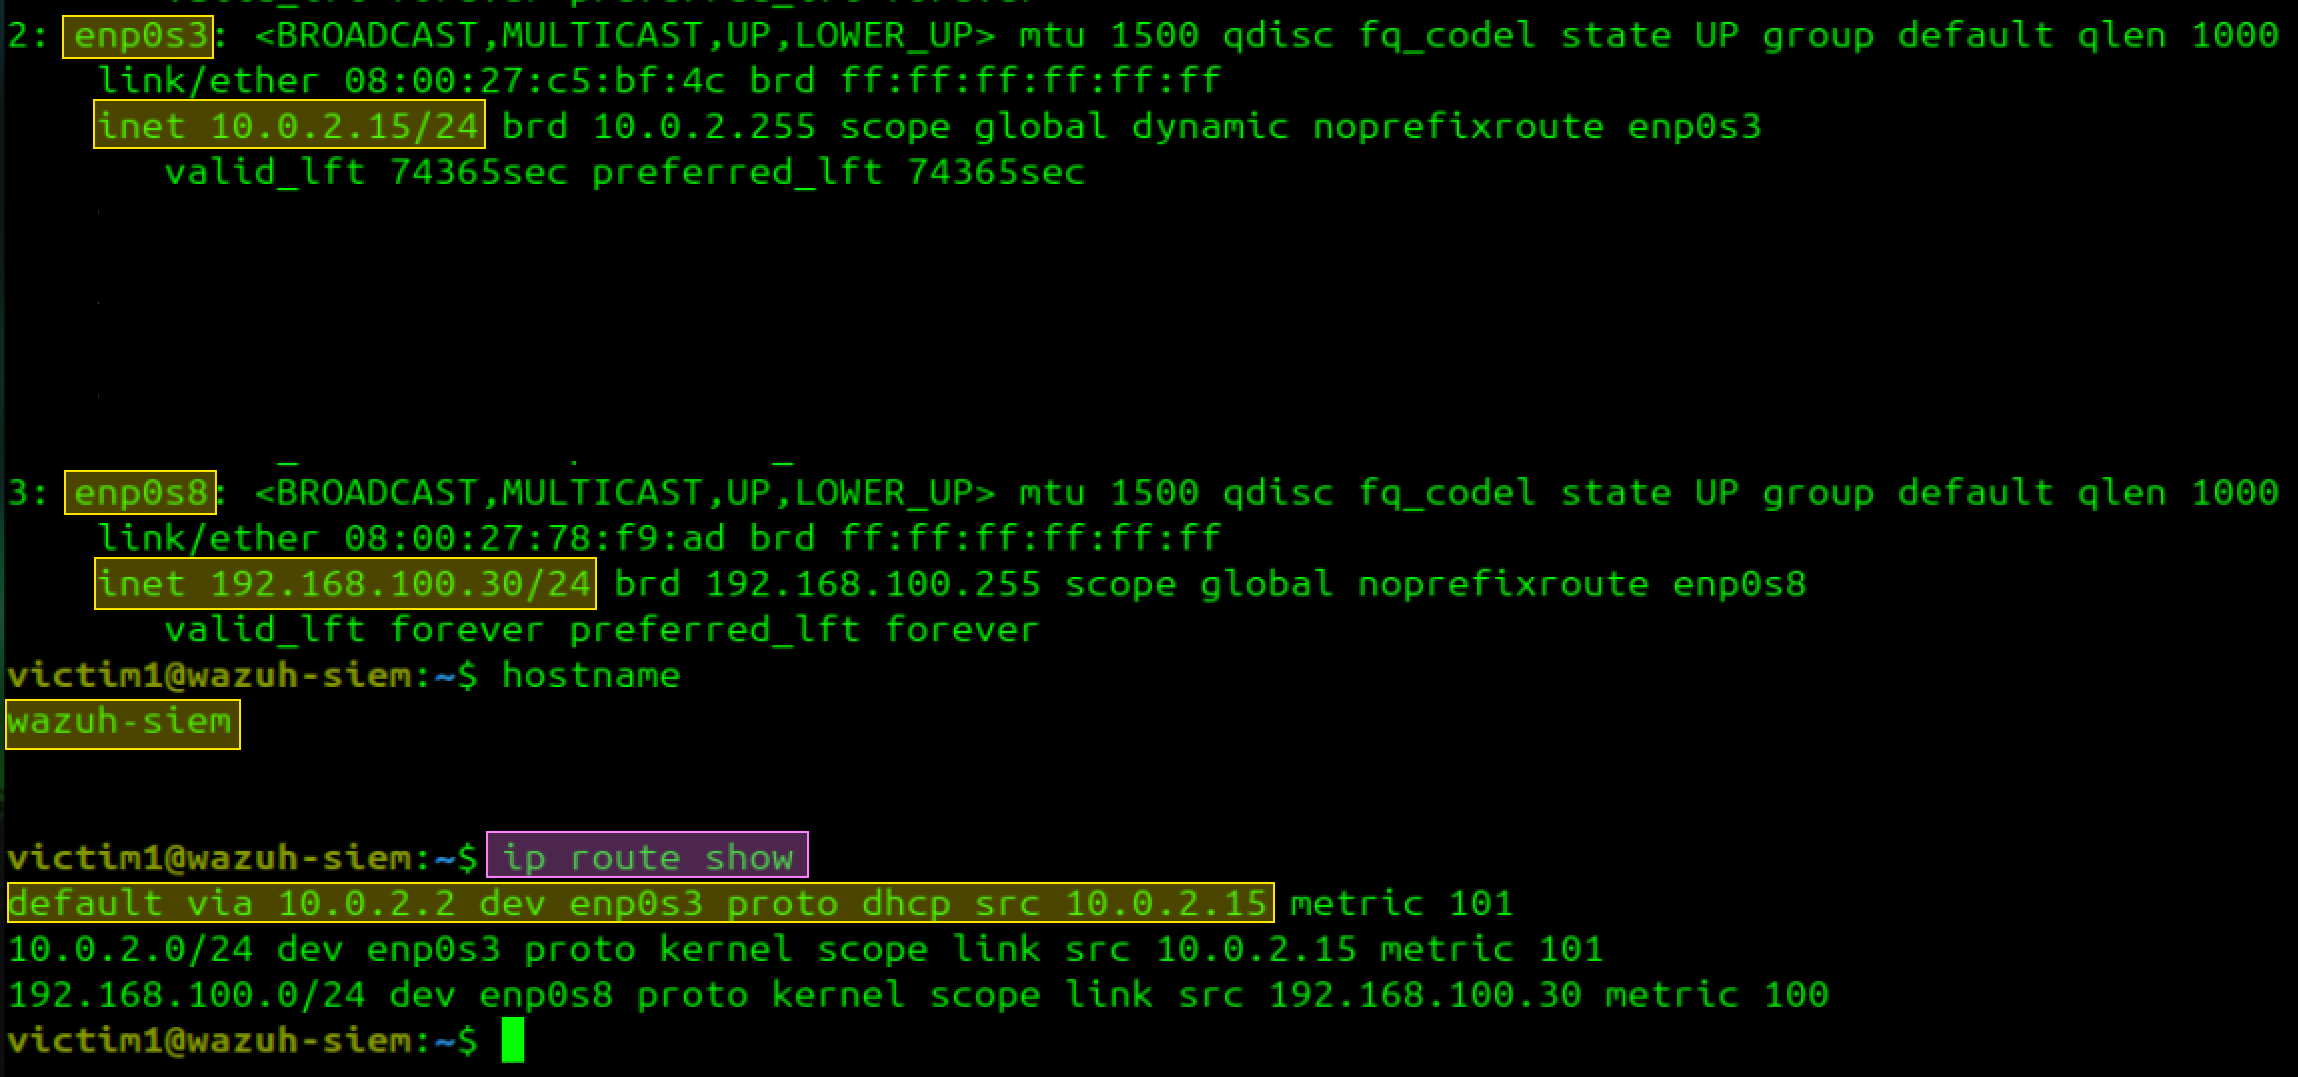
4.1.2 Network Configuration
The Wazuh VM requires two network adapters:
-
Adapter 1 (enp0s3): NAT for internet access during installation and updates
-
Adapter 2 (enp0s8): Internal network
malware_labfor agent/VM communication
After adding Adapter 2 in VirtualBox, configure it using NetworkManager:
nmcli connection show # Check available connection names

# Fix current ethernet connection to use DHCP instead (removes any static IP assigned by GUI like APIPA)
sudo nmcli connection modify "Profile 1" 802-3-ethernet.mac-address ""
sudo nmcli connection modify "Profile 1" ipv4.method auto ipv4.addresses "" ipv4.gateway "" ipv4.dns ""
sudo nmcli connection up "Profile 1"

# Configure ethernet with static IP for internal network. NOTE: showed enp0s8 is default VM configuration, you might encounter similar or different set up. To know yours use ip addr, then proceed with the commands below
sudo nmcli connection modify "netplan-enp0s8" 802-3-ethernet.mac-address ""
sudo nmcli connection modify "netplan-enp0s8" ipv4.method manual ipv4.addresses "192.168.100.30/24" ipv4.gateway "" ipv4.dns ""
sudo nmcli connection up "netplan-enp0s8"

</div>

</div> Verify: ```bash ip a show enp0s3 # should show 10.0.2.15/24 ip a show enp0s8 # should show 192.168.100.30/24 ip route show # default via 10.0.2.2 dev enp0s3 only ```
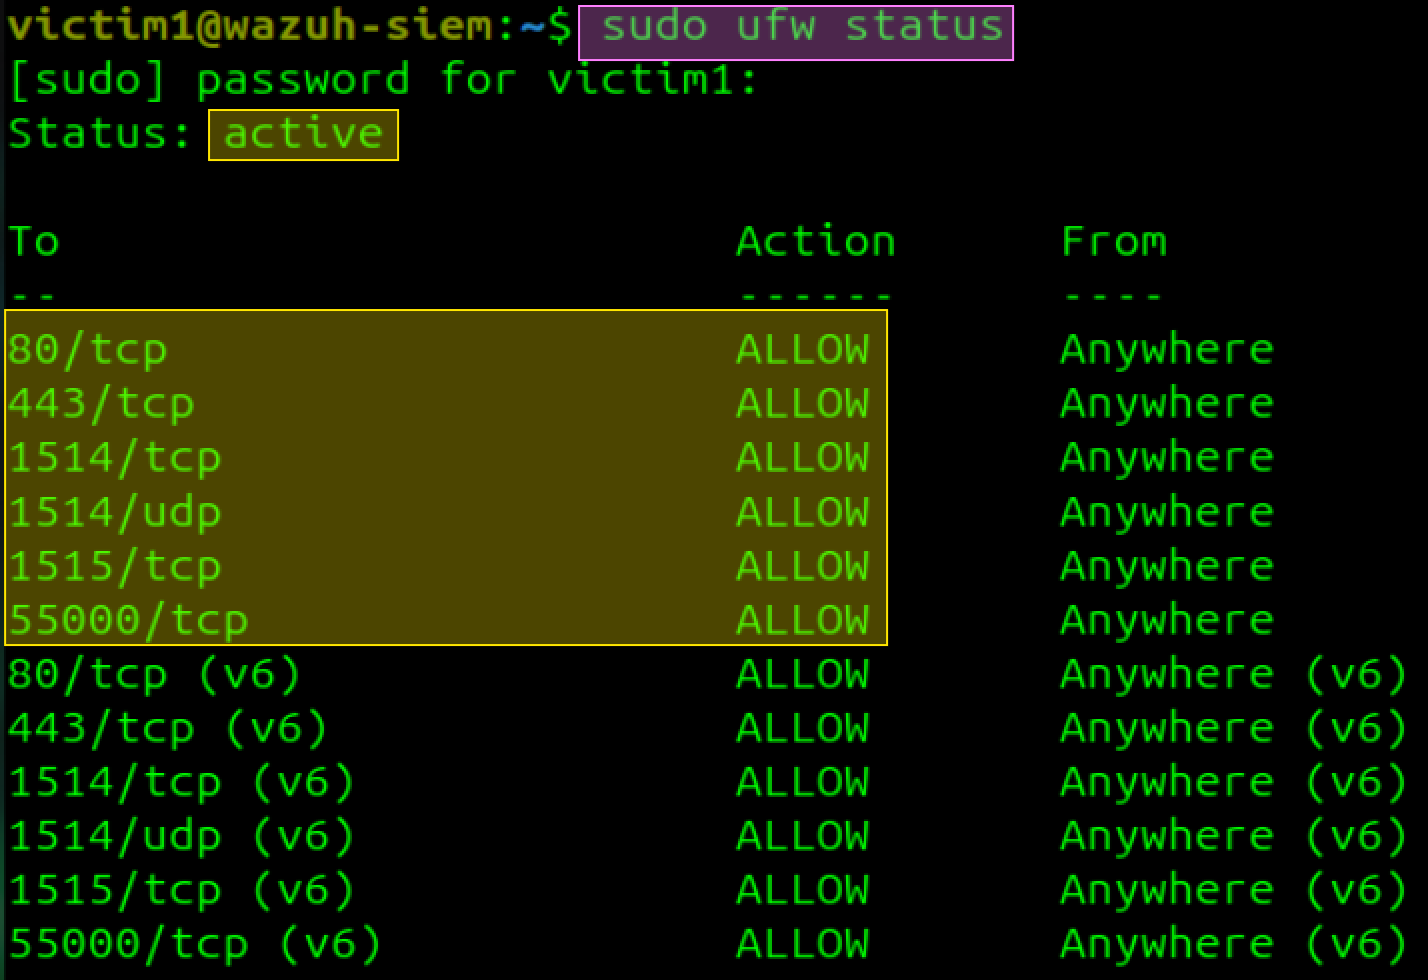
</div> --- ### 4.1.3 Firewall Rules There is some ports that must be enabled so basic Wazuh agents can connect and communicate with Dynamic/ Static VMs. You can enabled as many agents you want, but this is for learning purposes only, lets keep it simple. ```bash sudo ufw allow 443/tcp # dashboard sudo ufw allow 1514/tcp # agent communication sudo ufw allow 1514/udp # agent communication sudo ufw allow 1515/tcp # agent enrollment sudo ufw allow 55000/tcp # Wazuh API sudo ufw enable sudo ufw status numbered ```
</div> --- ### 4.1.4 Service Verification Fix systemd timeout before starting services (Wazuh takes longer than the default timeout): ```bash sudo mkdir -p /etc/systemd/system/wazuh-manager.service.d sudo nano /etc/systemd/system/wazuh-manager.service.d/timeout.conf ``` Add: ```ini [Service] TimeoutStartSec=180 ```
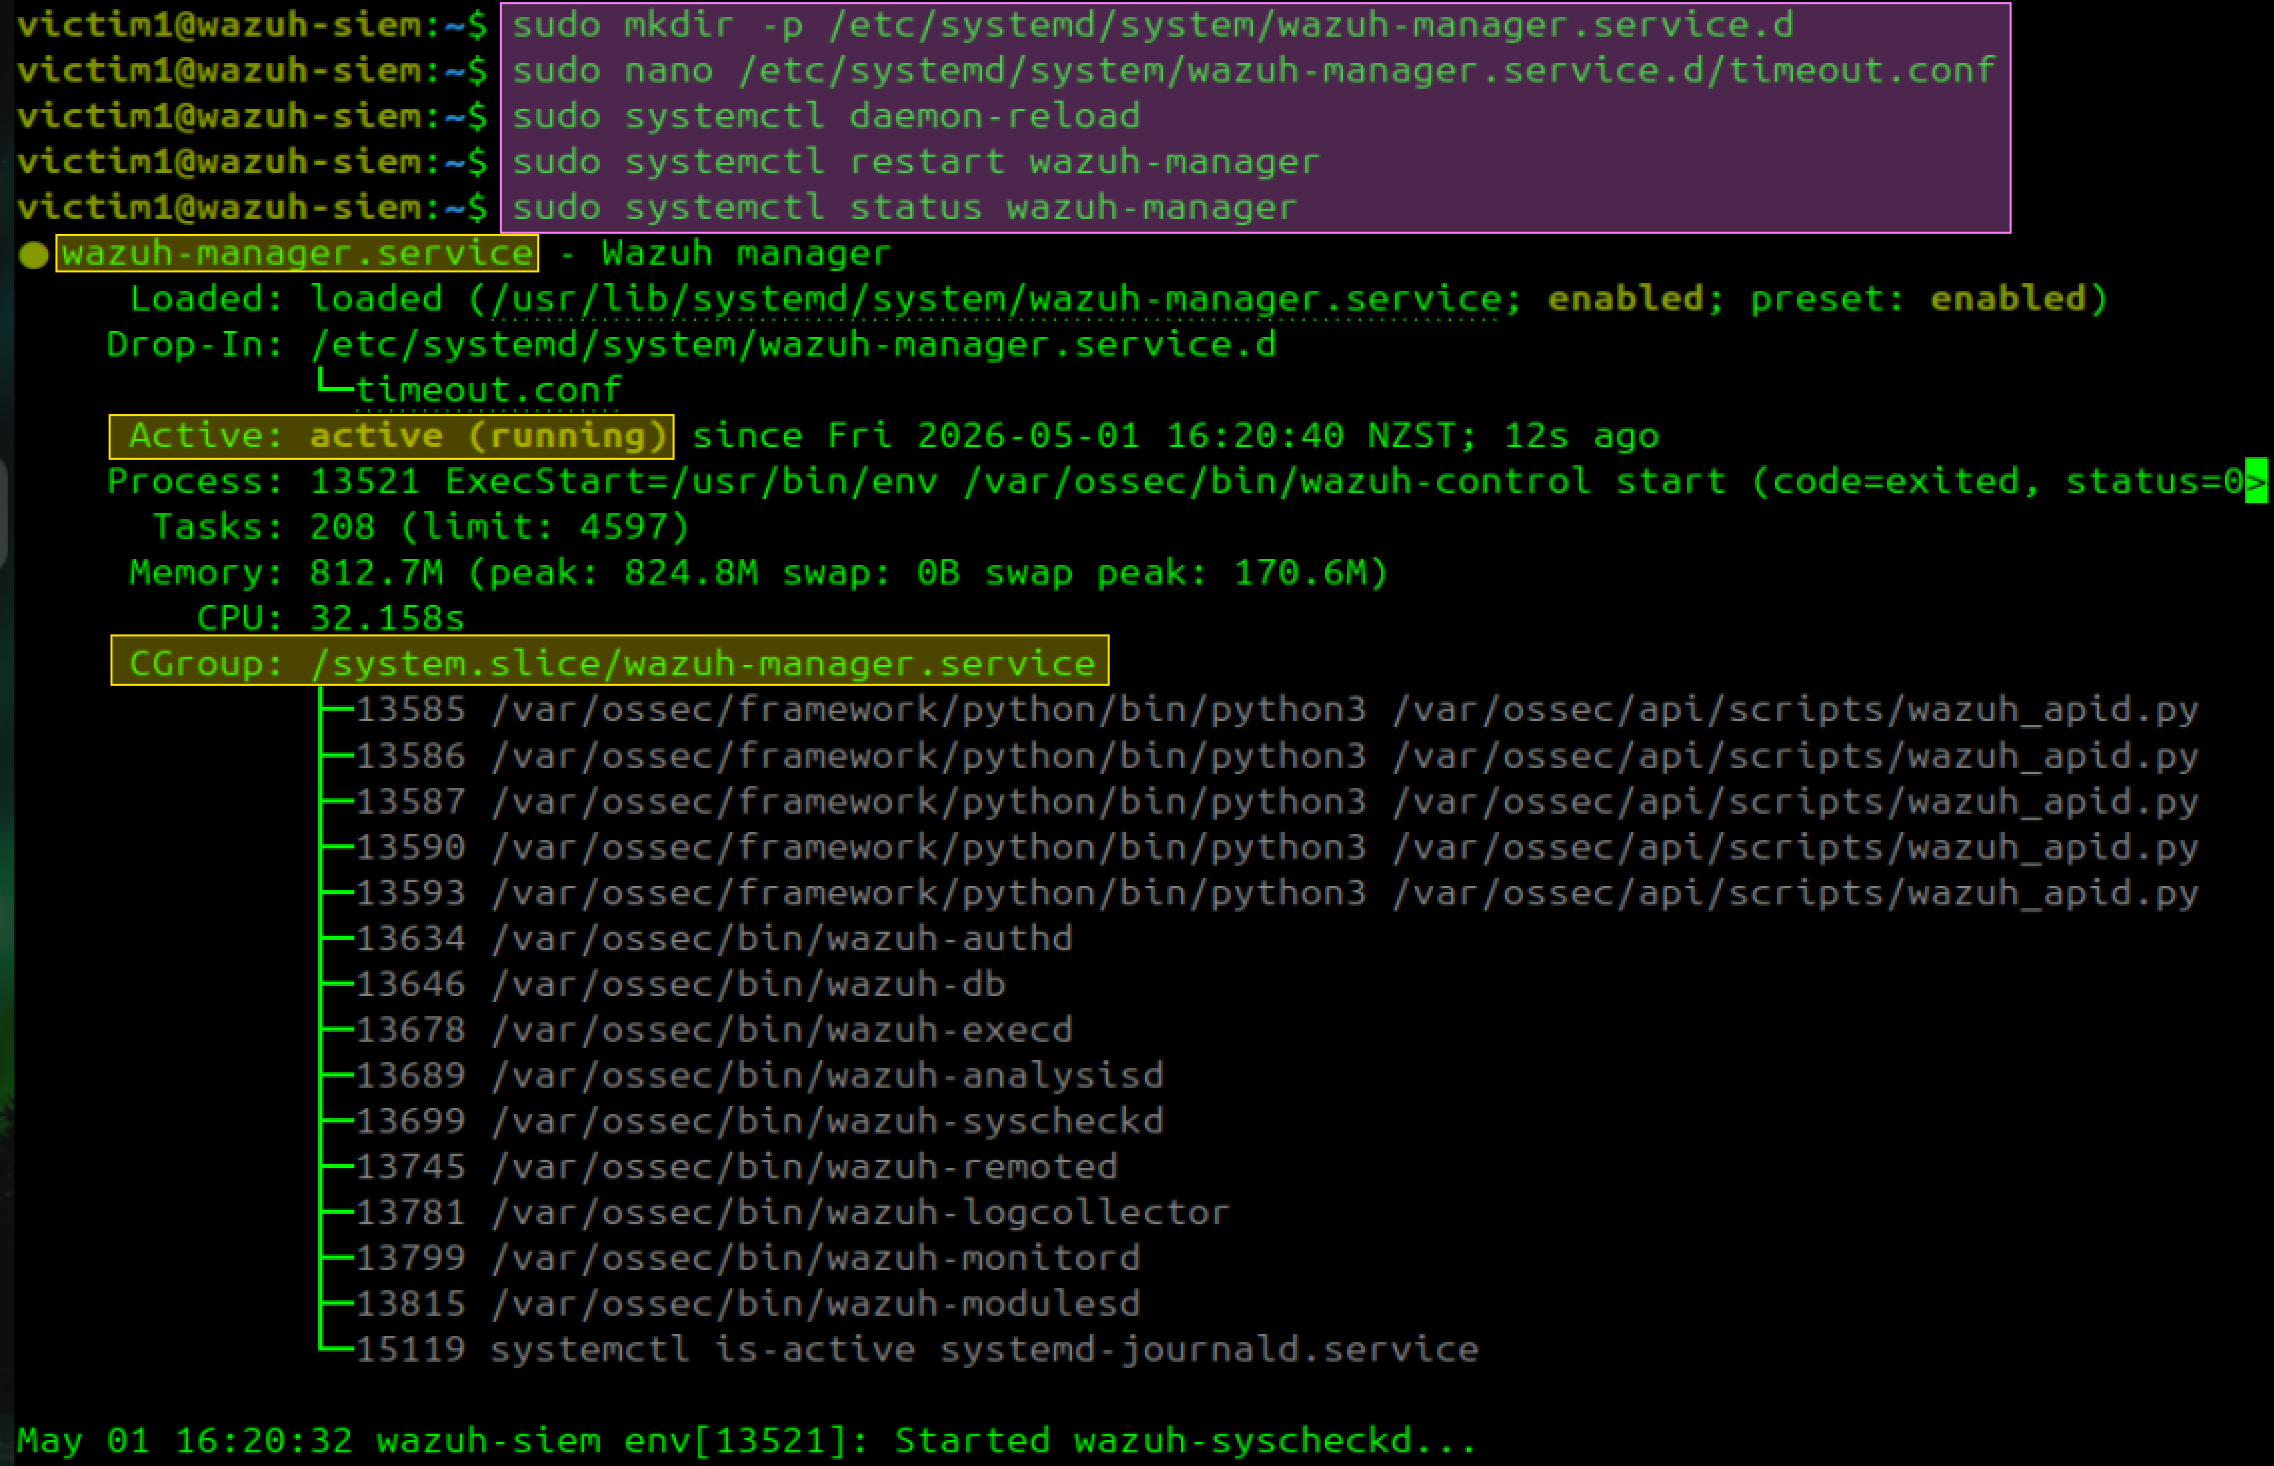
</div> ```bash # This will ensure Wazuh services are active and running sudo systemctl daemon-reload sudo systemctl restart wazuh-manager sudo systemctl status wazuh-manager ``` Verify all four services are running: ```bash sudo systemctl status wazuh-indexer sudo systemctl status wazuh-dashboard sudo systemctl status filebeat ```

</div>
Fix NTP sync (required for agent communication):
```bash
sudo timedatectl set-ntp true
sudo timedatectl status
```
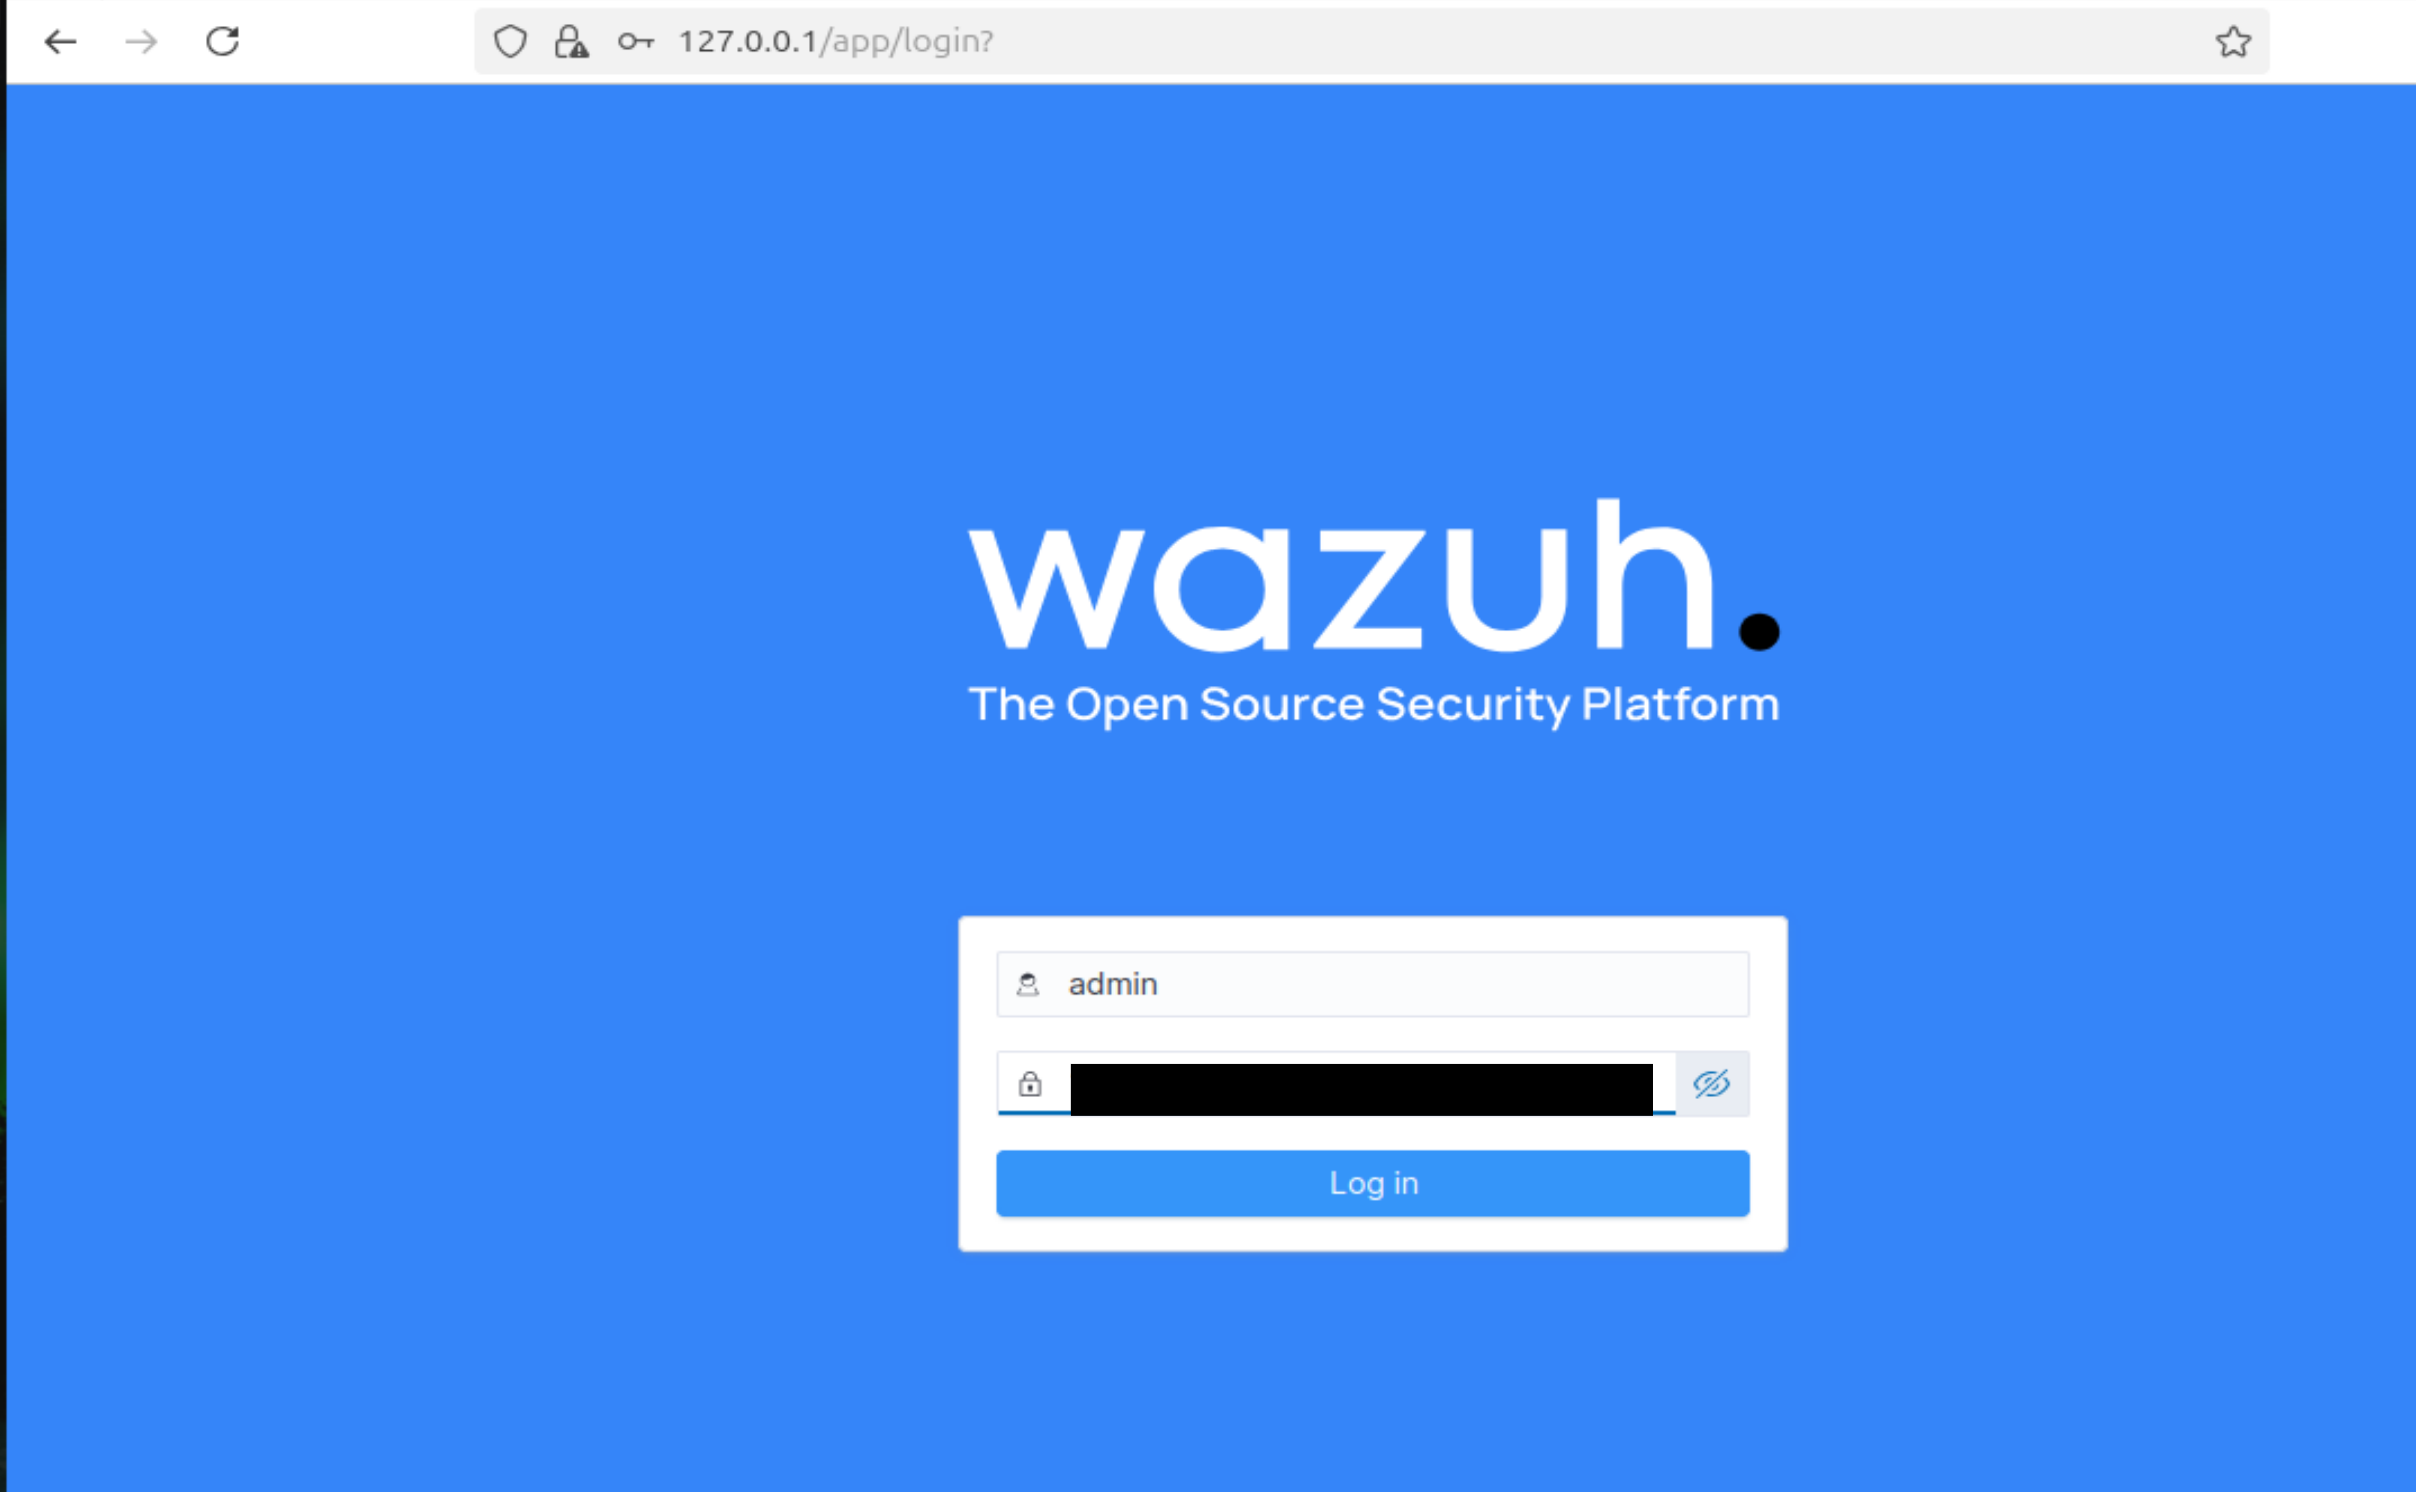
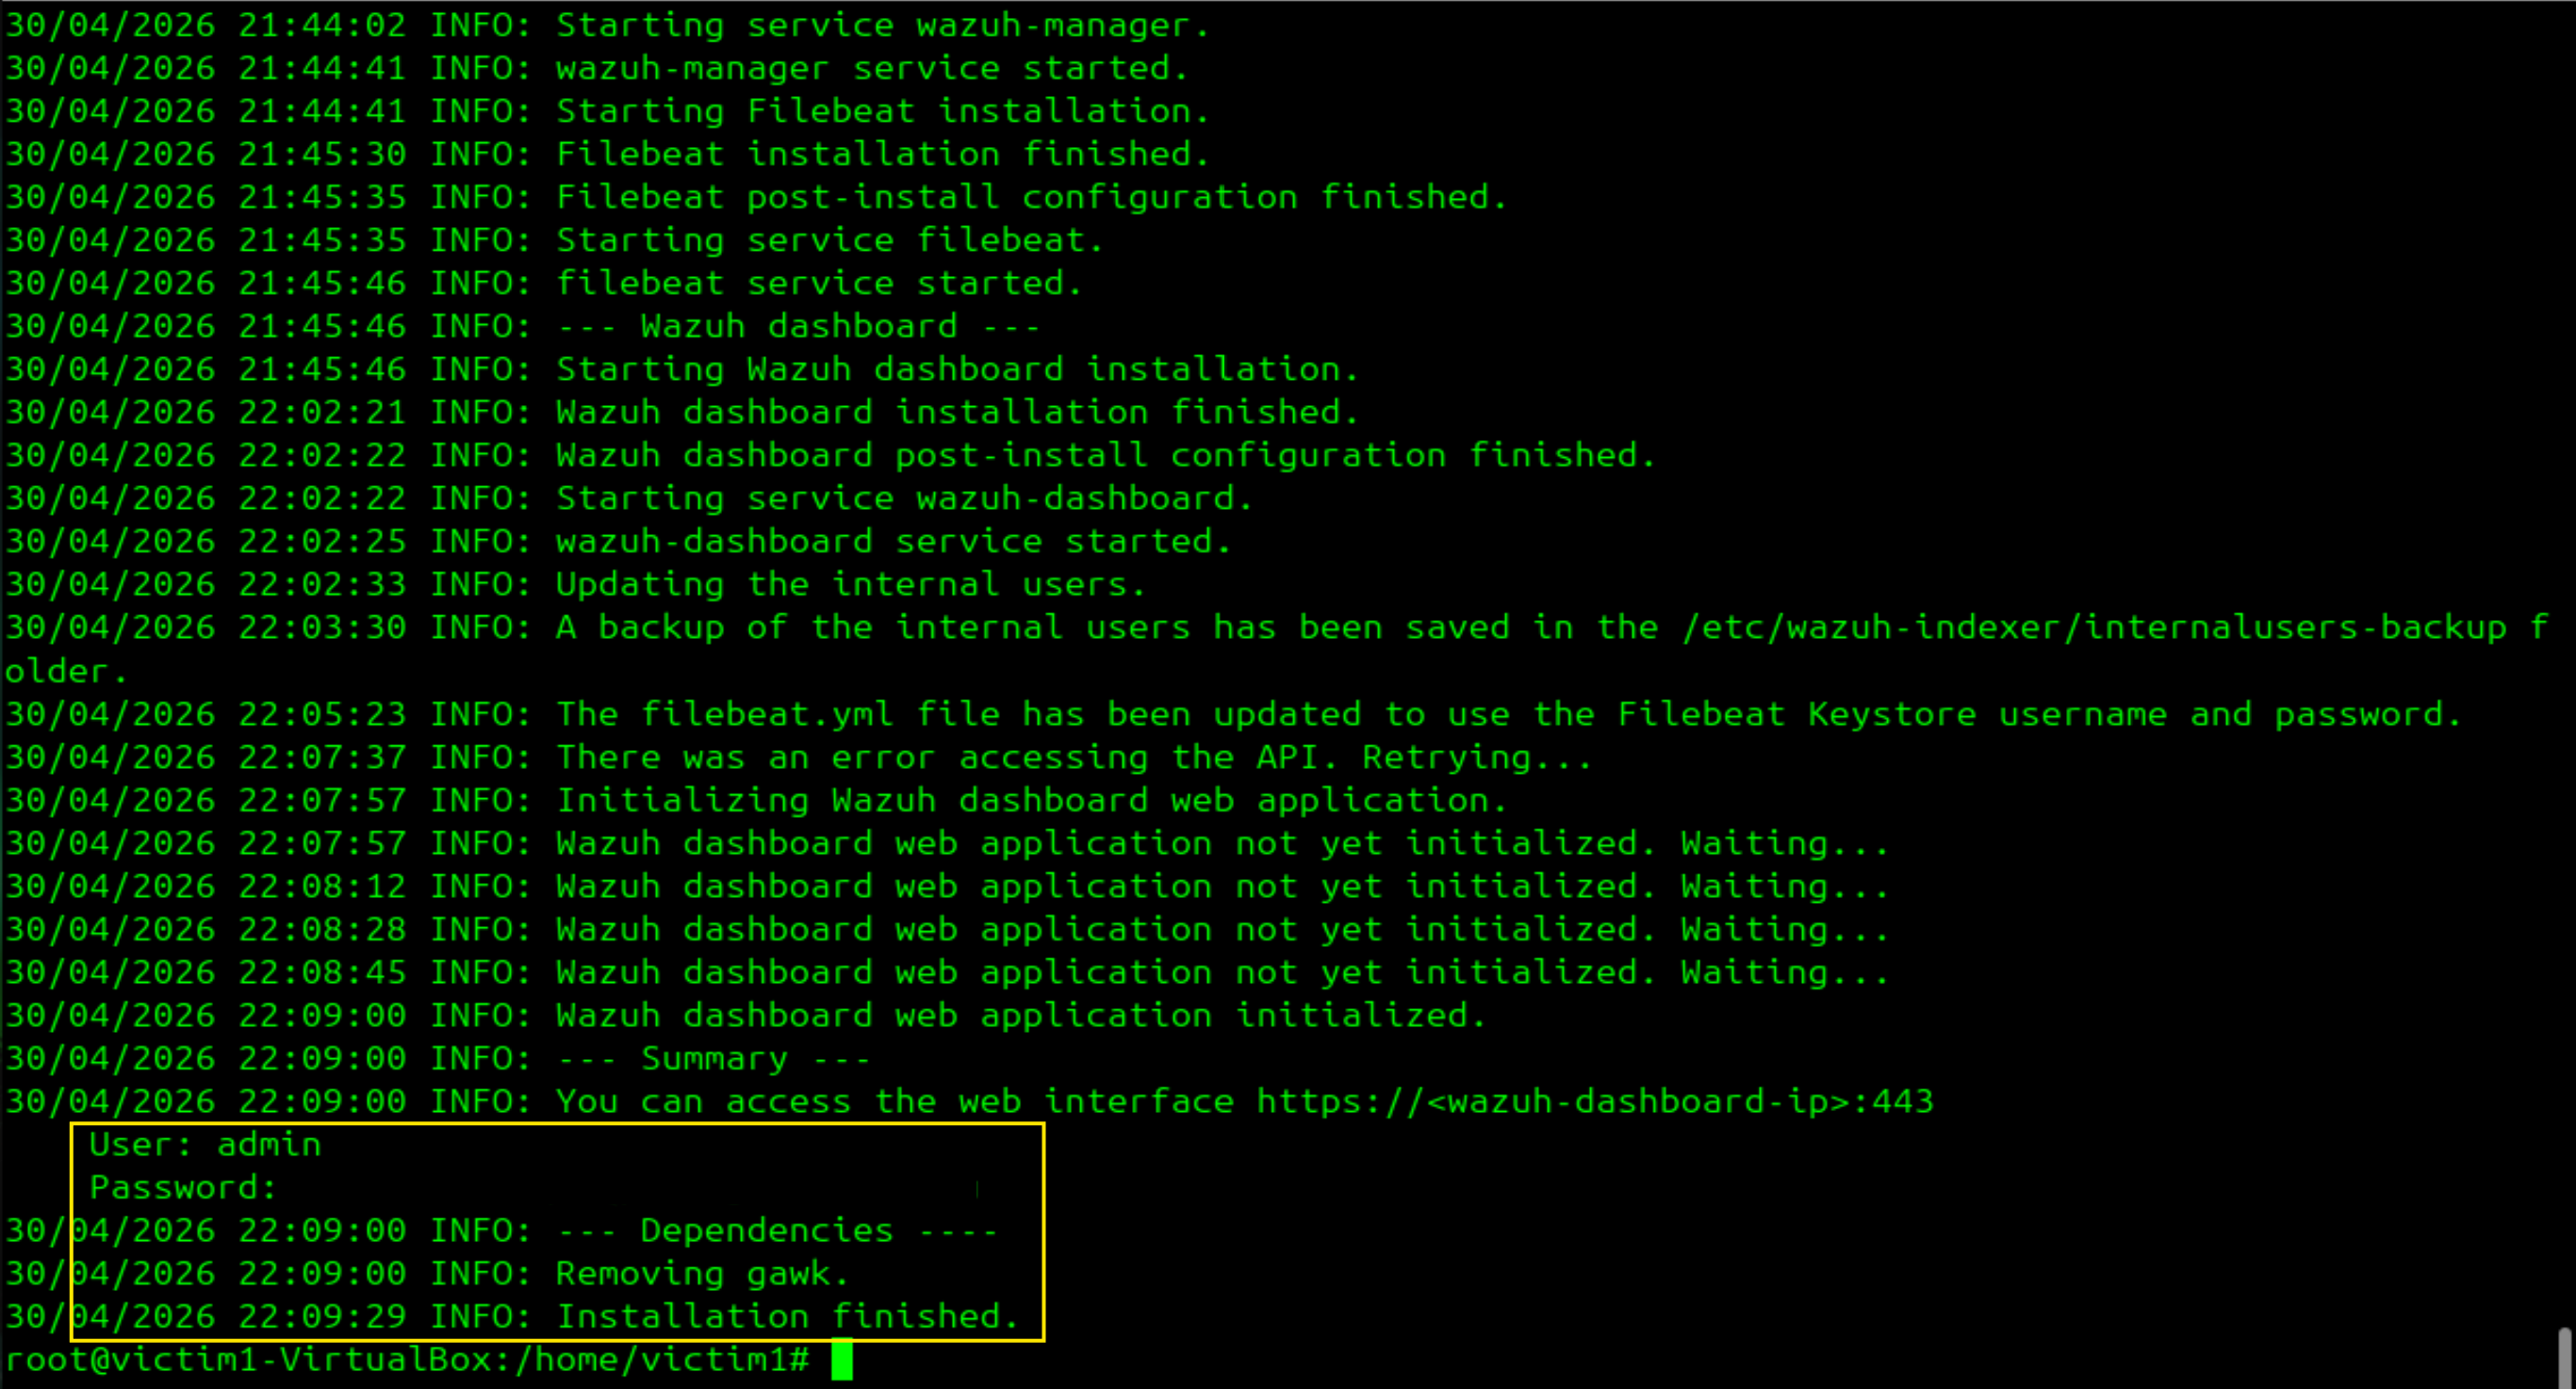
Access the dashboard from within the Wazuh VM browser:
```
https://127.0.0.1:443
Username: admin
Password: </div>
---
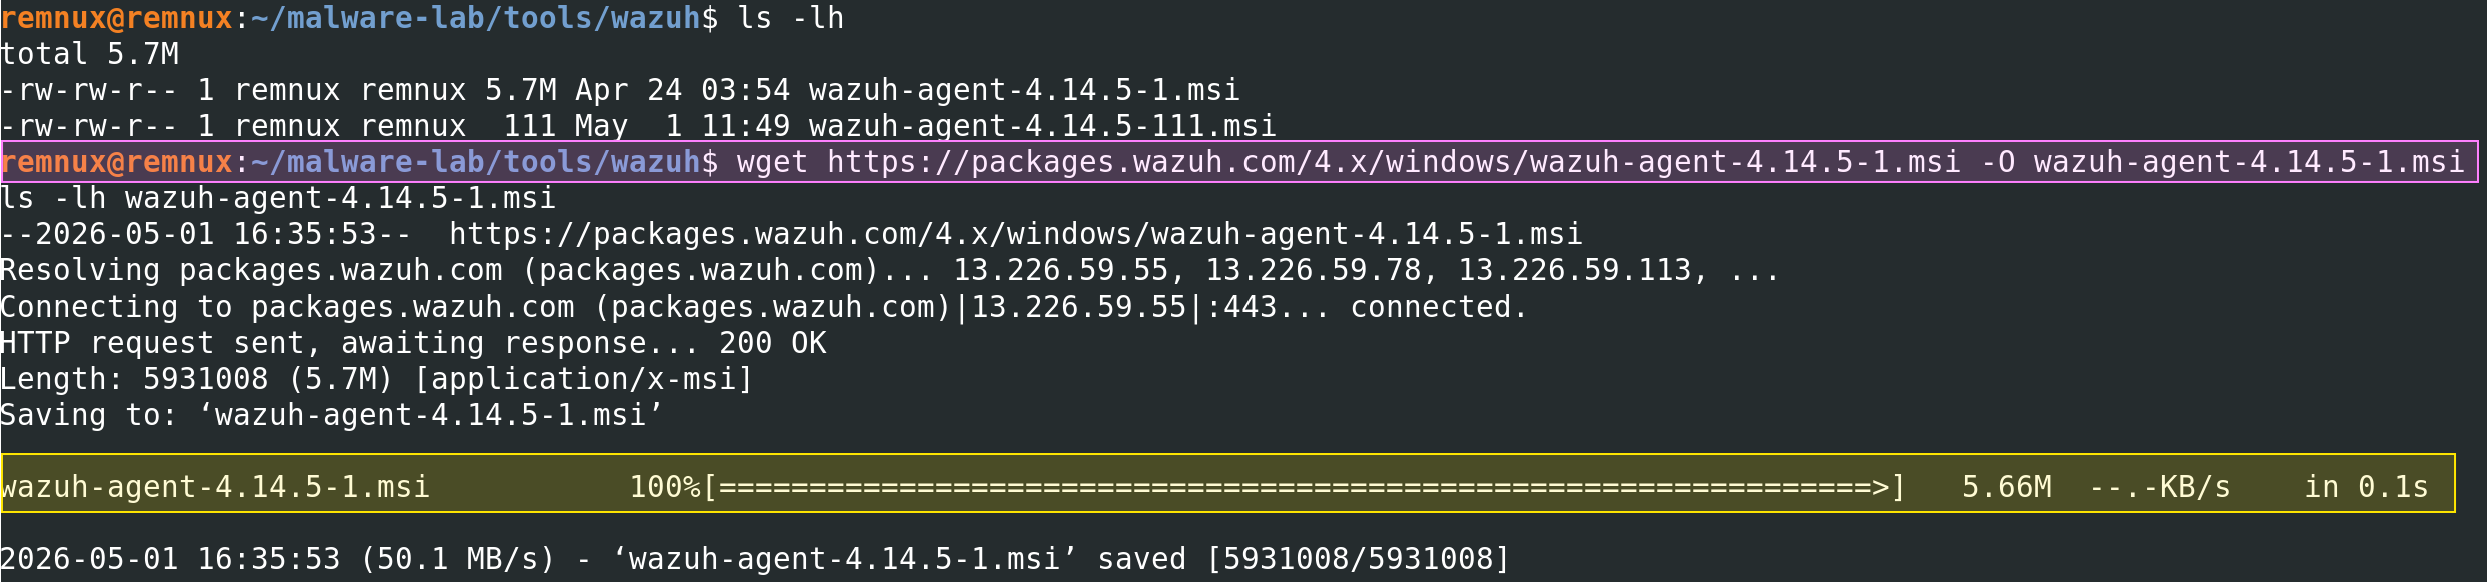
## 5. WAZUH Agent Deployment
### 5.1. Agent Deployment in Windows Static VM
The Windows FLARE-VMs have no internet access. The agent installer must be downloaded on REMnux and deployed via the Wazuh dashboard wizard. By following these steps you will connect both VMs to your Wazuh dashboard from which you will be able to analyse their behaviour using a SIEM tool.
**Step 1 — Enable NAT temporarily on Windows Static VM**
**Step 2 — In Wazuh dashboard**
```
Endpoints → Deploy new agent
→ WINDOWS → MSI 32/64 bits
# Use your REMnux IP address
→ Server address: [IP address]
# I used this name but you can add any you want
→ Agent name: Static-WindEt10-FLARE
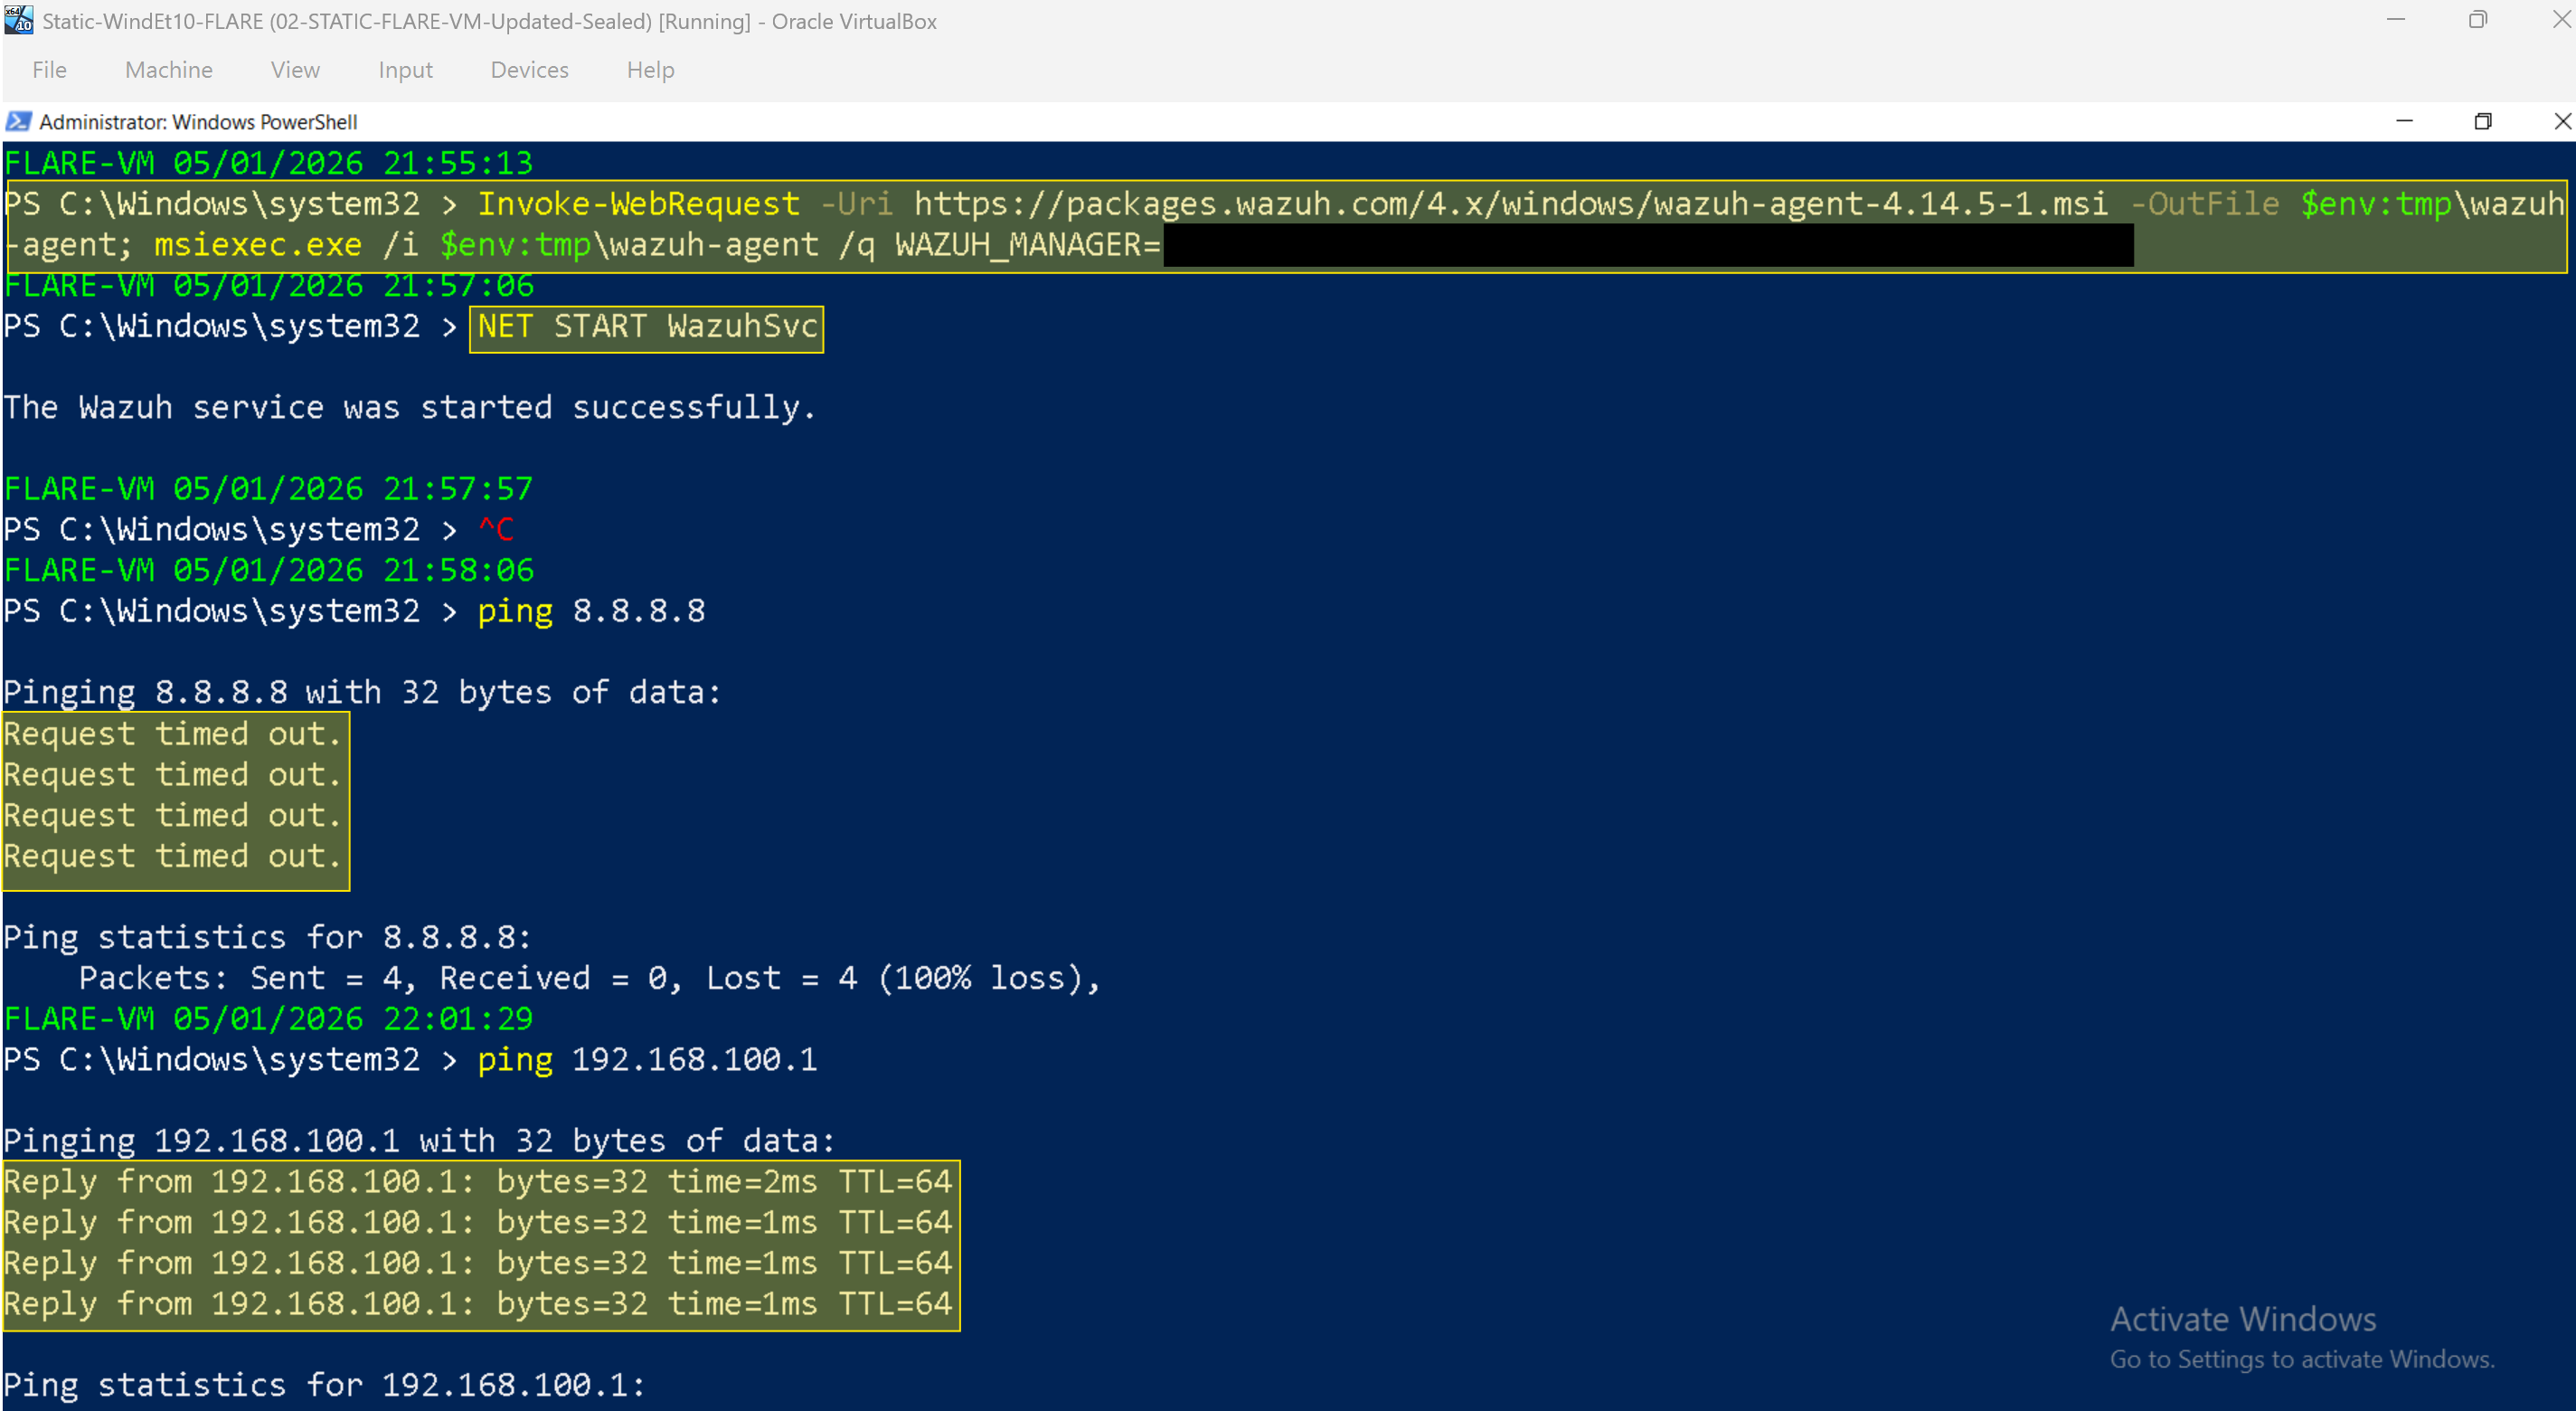
→ Copy the generated PowerShell command showed below into your Static VM PowerShell terminal. Use these screenshots as guideline.
```
</div>
</div>
**Step 3 — Run on Windows Static VM PowerShell as Administrator**
</div>
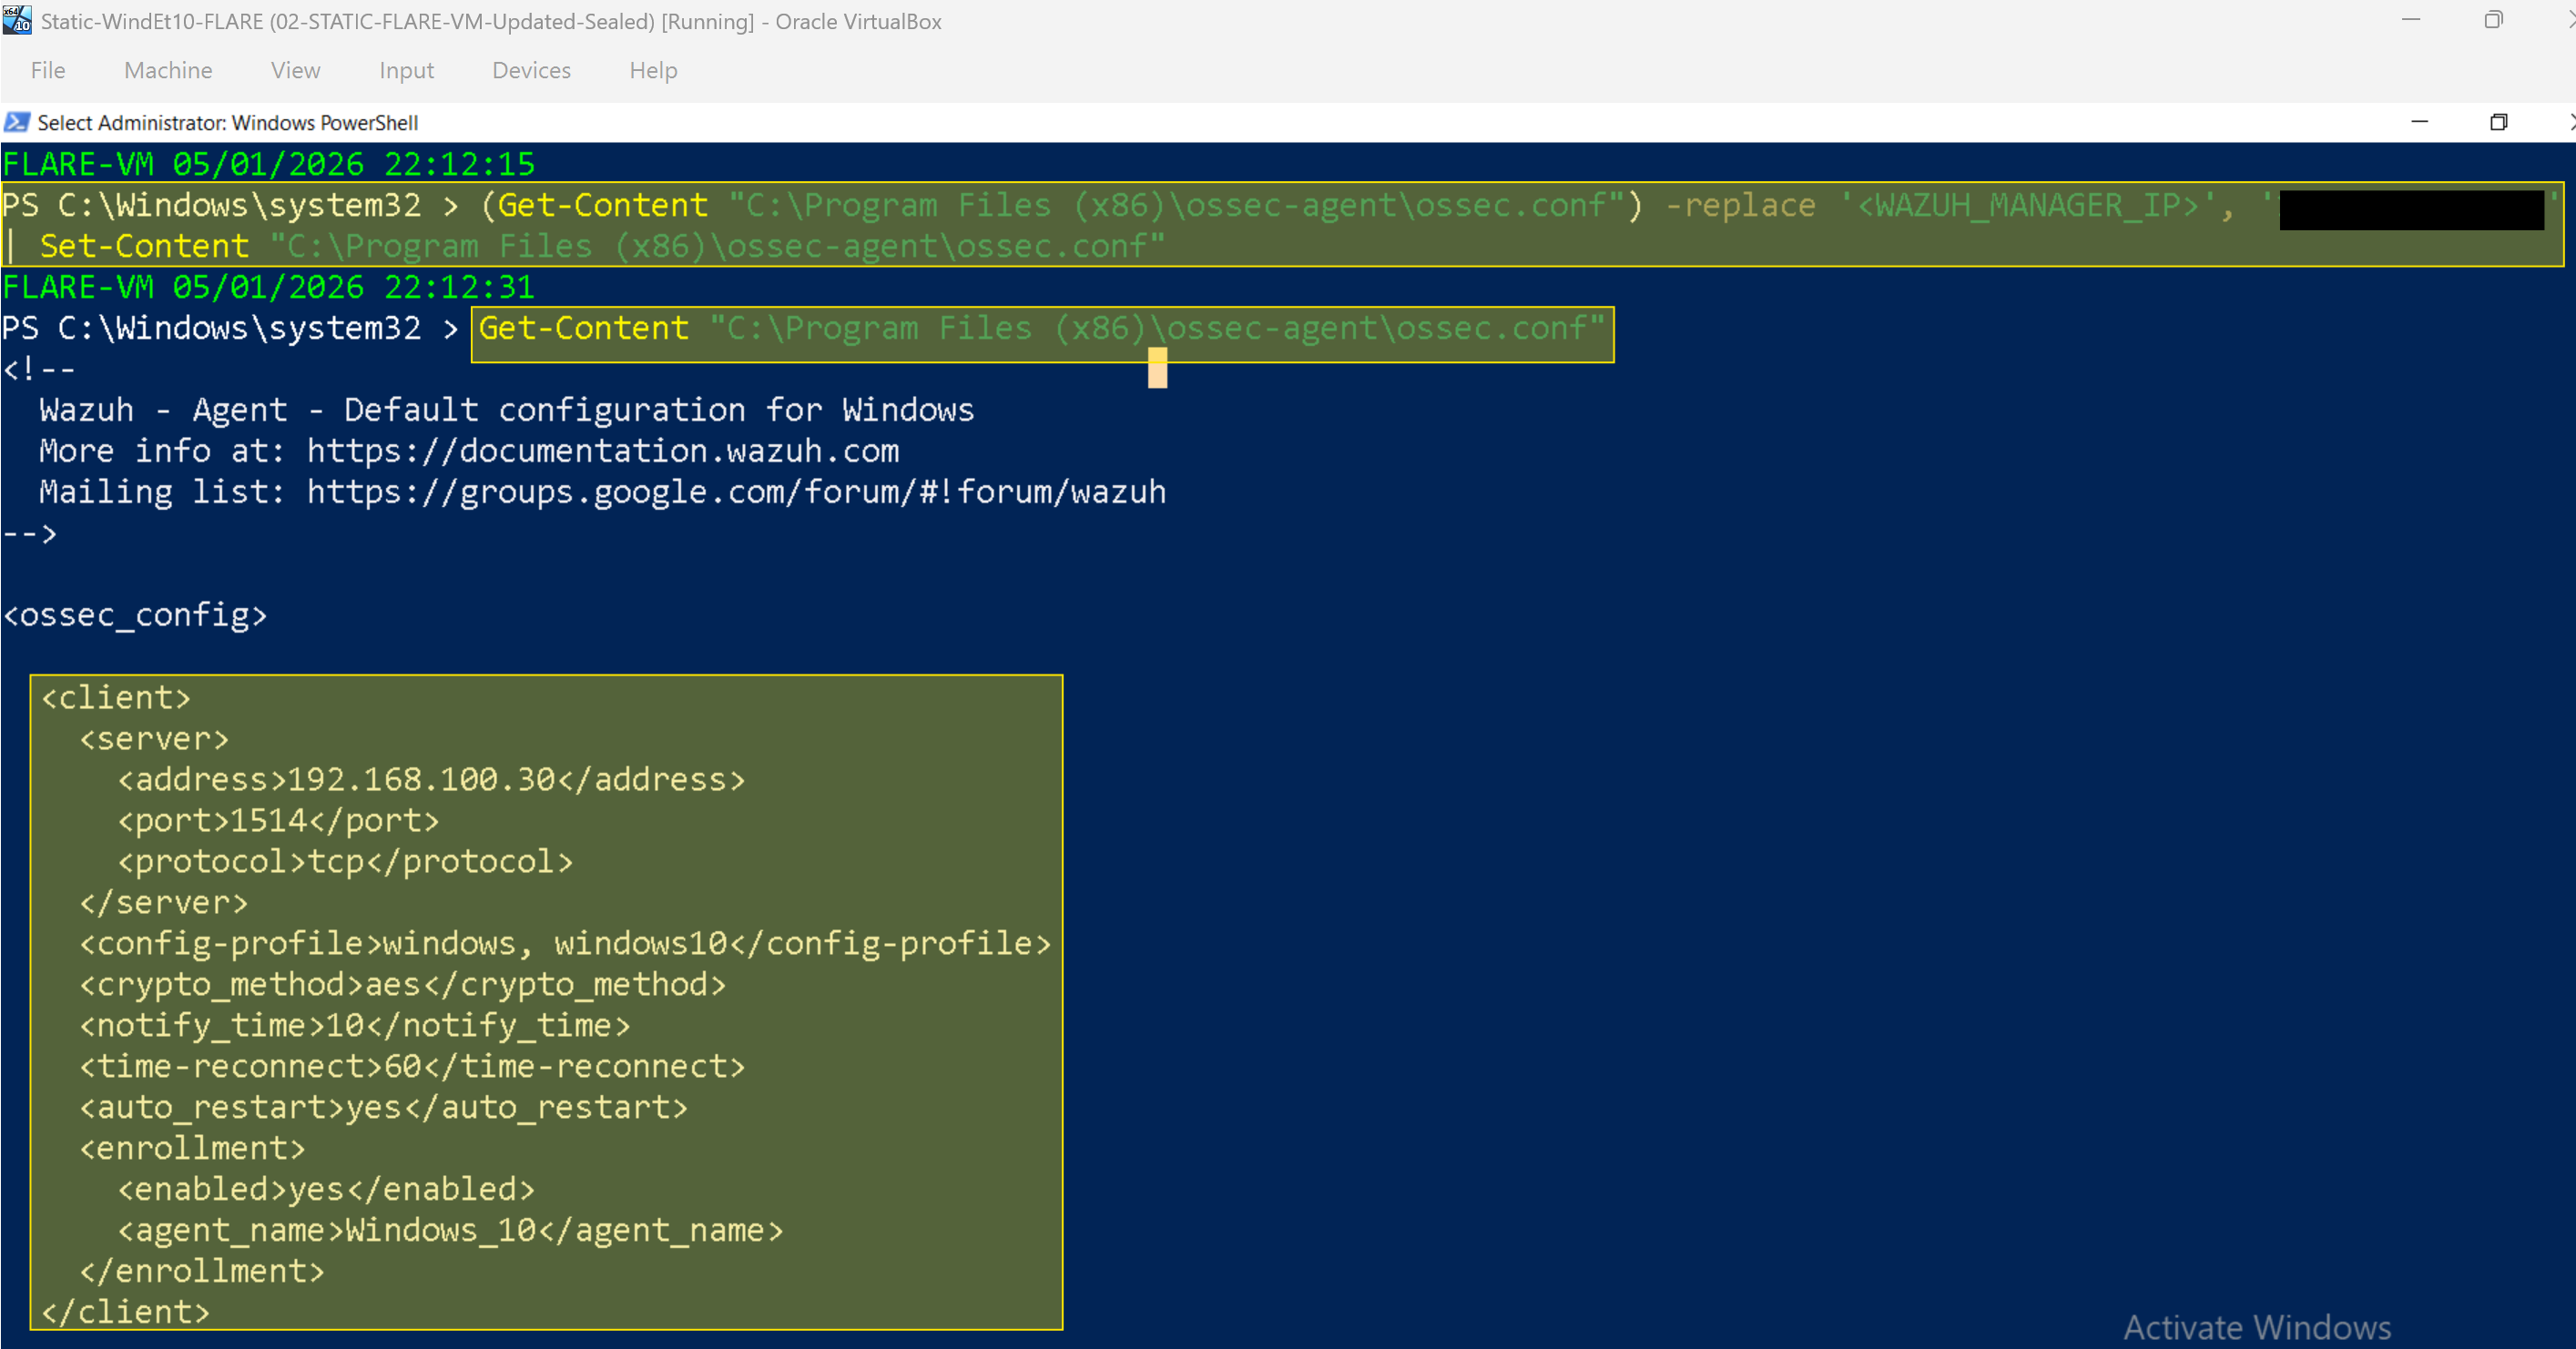
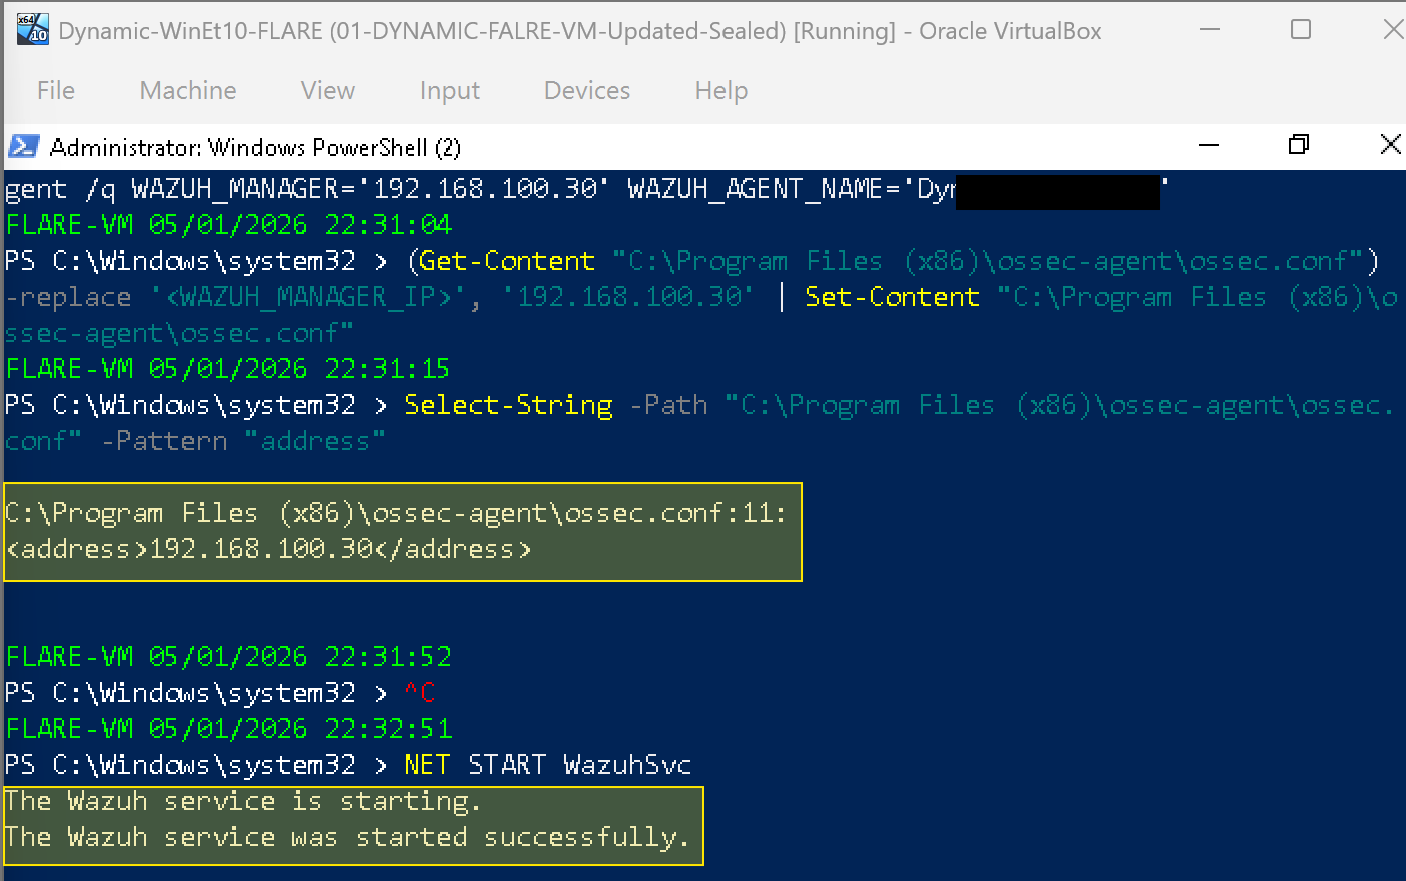
**Step 4 — Fix the manager IP in the config file**
The installer leaves a placeholder in the config. Replace it:
```powershell
(Get-Content "C:\Program Files (x86)\ossec-agent\ossec.conf") -replace ' </div>
Fix the agent name only if you need it via:
```powershell
(Get-Content "C:\Program Files (x86)\ossec-agent\ossec.conf") -replace ' </div>
**Step 6 — Disable NAT on Windows Static VM**
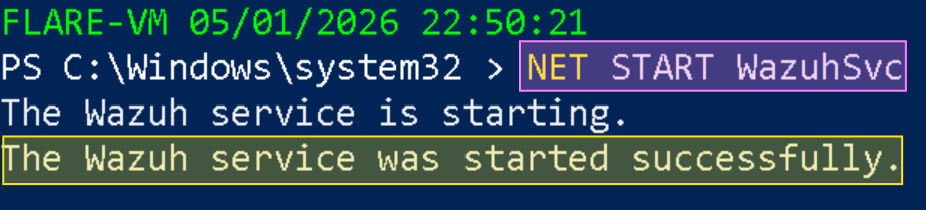
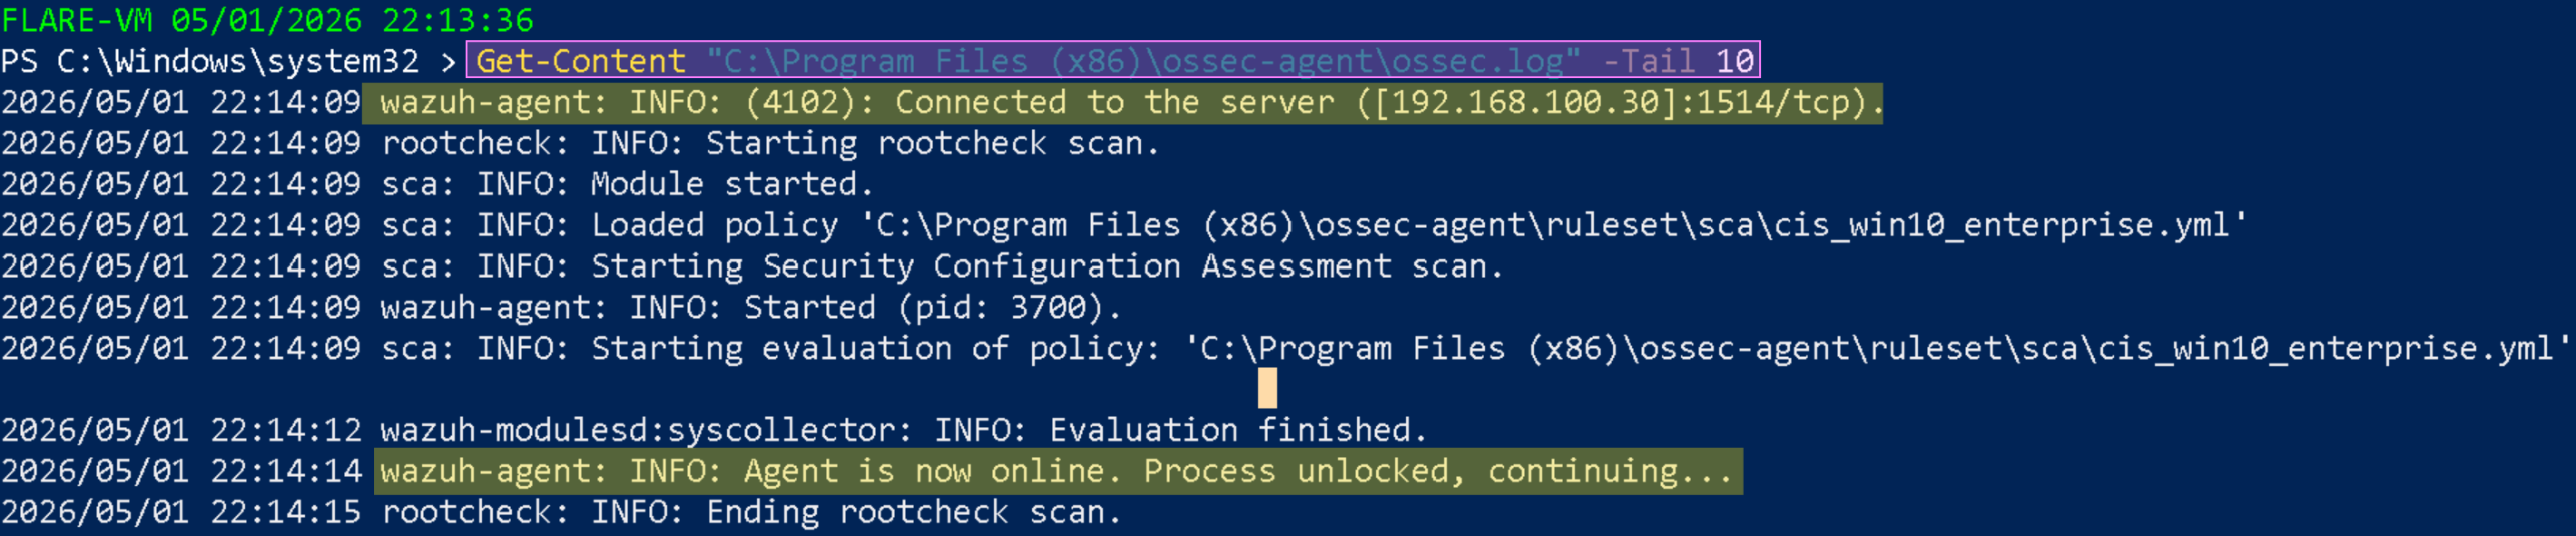
**Step 7 — Verify agent is connected**
```powershell
Get-Content "C:\Program Files (x86)\ossec-agent\ossec.log" -Tail 10
```
Expected:
</div>
---
### 5.2 Agent Deployment — Windows Dynamic VM
Repeat Section 5.1 with the following differences:
- Agent name: `Dynamic-WinEt10-FLARE`
- Target IP: Your Dynamic VM Ip address you assigned manually
Fix agent name in config:
```powershell
(Get-Content "C:\Program Files (x86)\ossec-agent\ossec.conf") -replace ' </div>
---
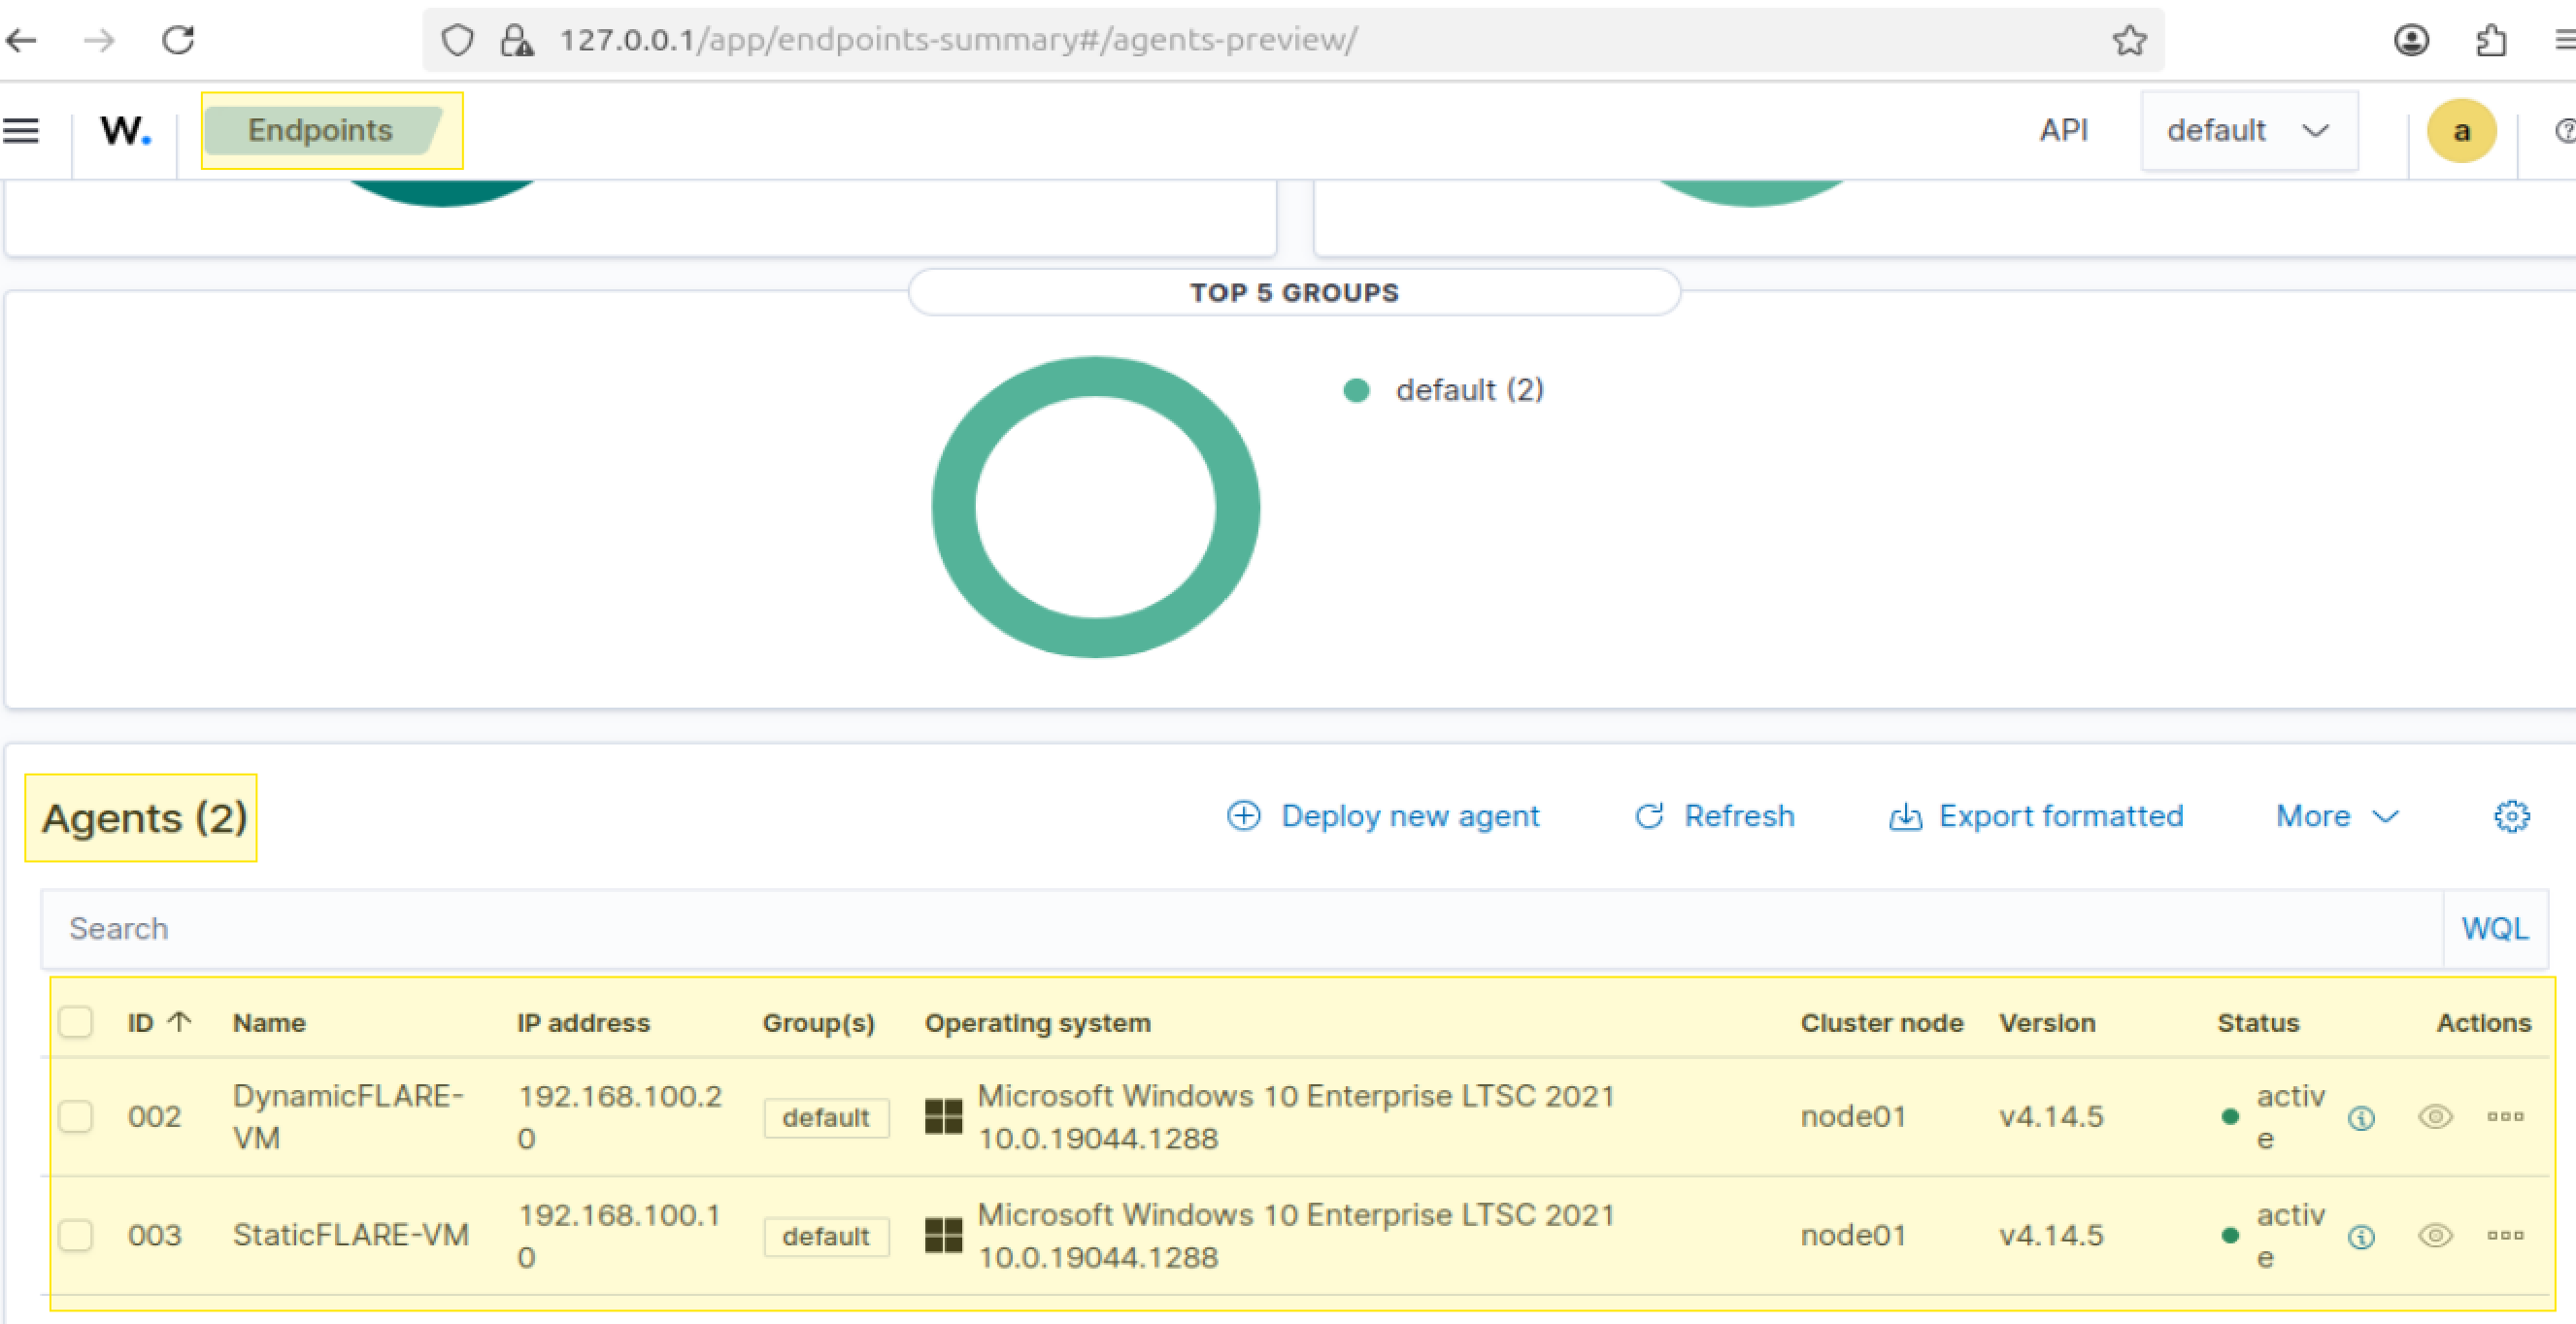
## 6. Dashboard Verification
**Machines that must be ON:** Wazuh VM, Windows Static VM, Windows Dynamic VM
In the Wazuh dashboard at `https://127.0.0.1:443`:
```
Agents management → Summary
```
Expected:
</div>
This confirms that both Dynamic and Static VMs are connected to Wazuh SIEM Dashboard and the agents are on alert mode for any suspicious behaviour occurring during malware analysis. This will add extra information to the purpose of this lab.
---
## 7. Faking NAT connectivity
### 7.1 - INetSim Setup
INetSim simulates HTTP, HTTPS, SMTP, FTP and other internet services on REMnux. When malware attempts network connections, INetSim responds with convincing fake content while keeping malware active long enough to observe its full behaviour.
Three values must be set in `/etc/inetsim/inetsim.conf`:
```bash
# This enables DNS service
sudo sed -i 's/#start_service dns/start_service dns/' /etc/inetsim/inetsim.conf
# Set bind address to internal lab IP [your REMnux IP address]
sudo sed -i 's/#service_bind_address\t10.10.10.1/service_bind_address\t192.168.100.1/' /etc/inetsim/inetsim.conf
# Set DNS default response IP
sudo sed -i 's/#dns_default_ip\t\t10.10.10.1/dns_default_ip\t\t192.168.100.1/' /etc/inetsim/inetsim.conf
```
Verify all three changes:
```bash
grep -E "start_service dns|service_bind_address|dns_default_ip" /etc/inetsim/inetsim.conf | grep -v "^#"
```
Expected:
</div>
Start INetSim:
```bash
sudo inetsim --log-dir /var/log/inetsim --report-dir /var/log/inetsim
```
Expected:
</div>
---
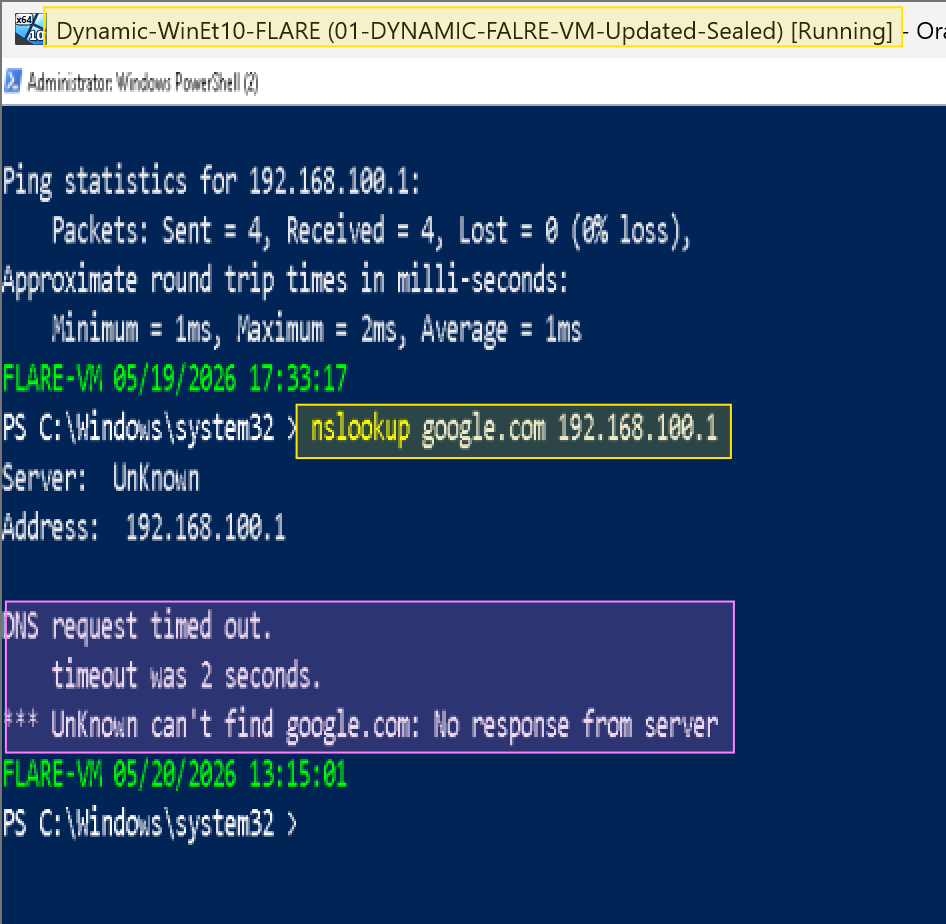
### 7.2 Known INETsim Issue: DNS simulation failures
INetSim's DNS service uses a deprecated Perl method that fails silently on current versions of Ubuntu or 24 LTS due to a `Net::DNS::Nameserver` compatibility issue. The DNS process starts but exits immediately without binding to port 53. Dynamic and Static machine won't be able to drop successful results after `nslookup`.
**Symptoms:**
- INetSim reports `dns_53_tcp_udp - started` but the process disappears from `ps aux`
- `ss -tulnp | grep 53` returns no output
- DNS queries from Windows VMs time out after `nslookup` check
</div>
**Solution:** Use **DNSChef** for DNS interception instead (see instructions belw). INetSim handles all other services correctly.
---
## 8. DNSChef Setup: DNS simulation
https://github.com/iphelix/dnschef
DNSChef is a DNS proxy tool that intercepts all DNS queries and returns a specified IP address. It is used in place of INetSim's broken DNS service.
### 8.1 Installation
```bash
# Disable systemd-resolved to free port 53
sudo systemctl stop systemd-resolved
sudo systemctl disable systemd-resolved
# Restore internet DNS for REMnux itself
echo "nameserver 8.8.8.8" | sudo tee /etc/resolv.conf
# Clone DNSChef from GitHub
cd ~/malware-lab/tools
git clone https://github.com/iphelix/dnschef.git
cd dnschef
# Fix ownership
sudo chown -R remnux:remnux ~/malware-lab/tools/dnschef
# Create virtual environment and install dependencies
python3 -m venv venv
source venv/bin/activate
pip install -r requirements.txt
```
Verify installation:
```bash
venv/bin/python dnschef.py --help | head
```
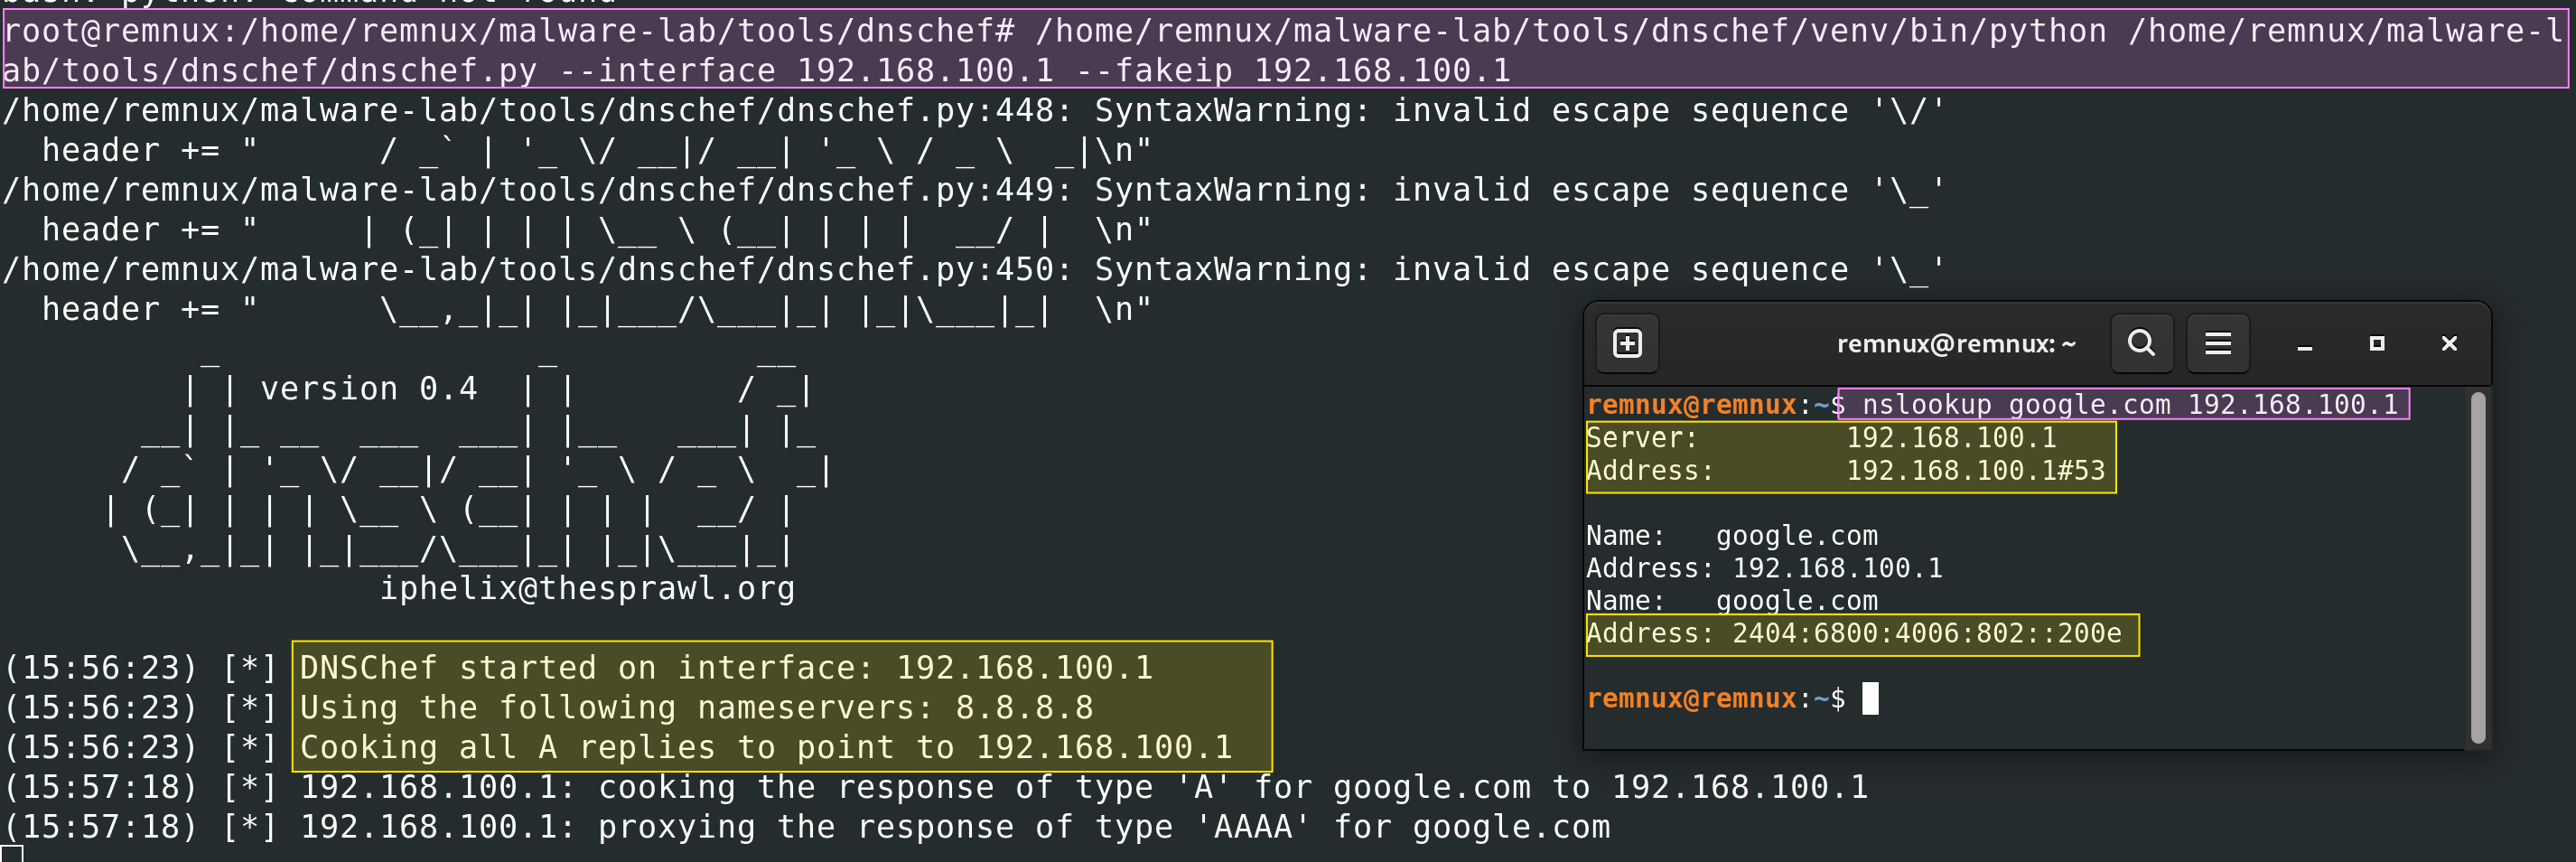
### 8.2 Running DNSChef
DNSChef must be run as root to bind to port 53:
```bash
cd ~/malware-lab/tools/dnschef
source venv/bin/activate
# safe version without calling sudo su
sudo /home/remnux/malware-lab/tools/dnschef/venv/bin/python /home/remnux/malware-lab/tools/dnschef/dnschef.py --interface 192.168.100.1 --fakeip 192.168.100.1
```
Expected:
</div>
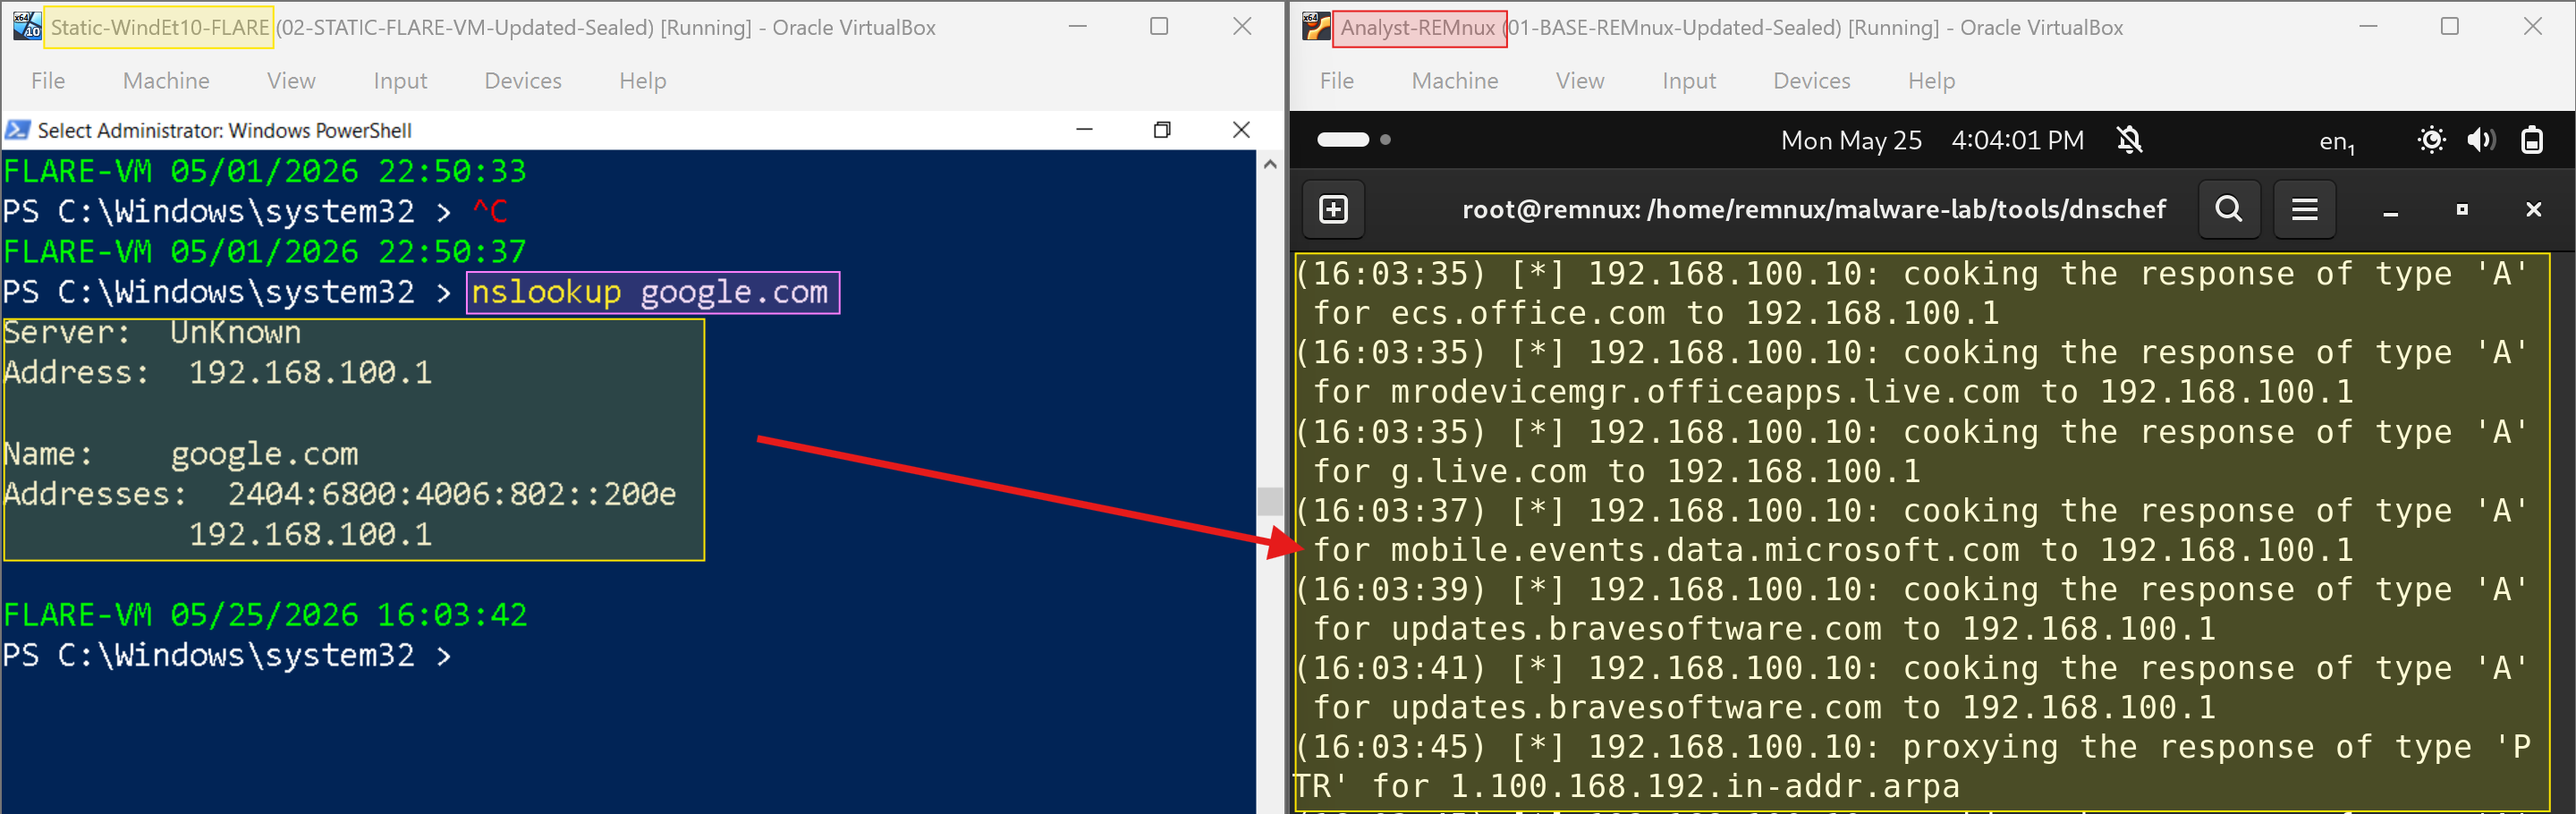
When a Windows VM queries any domain, DNSChef logs:
</div>
---
## 9. Lab Startup Script
To avoid manually starting INetSim and DNSChef every session, a startup script was created at `~/malware-lab/tools/start-lab.sh`:
Copy script from `malware-analysis/lab-02-basic-static-analysis/linux/start-lab.sh` from this repo, and then save it into `tools` directory within your REMnux VM
Make it executable:
```bash
# very important step, do not skip
chmod +x ~/malware-lab/tools/start-lab.sh
```
Run at the start of every dynamic analysis session via:
```bash
~/malware-lab/tools/start-lab.sh
```
---
## 10. References
1. Wazuh Inc. (2024). *Wazuh documentation: Installation guide*. https://documentation.wazuh.com/current/installation-guide/index.html
2. Wazuh Inc. (2024). *Deploying Wazuh agents on Windows endpoints*. https://documentation.wazuh.com/current/installation-guide/wazuh-agent/wazuh-agent-package-windows.html
3.
---
*Next entry: [Lab 03 — Static Analysis: String Extraction](../lab-03-static-analysis/03-string-extraction.md)* 🔄
*Previous entry: [Lab 02b — Hash Verification & Threat Intelligence](02b-hash-verification.md)* ✅
---